
How to Create a WordPress File Manager and Upload Files: A Detailed User Guide
-
Manish Sharma
-
03 Feb 2021
A big part of WordPress site management is storing and managing files. Site managers need a secure and easy informational storage system. WordPress site managers need operational support to supplement WordPress. Security and ease of use are the two top things to look for in a file manager plugin.
There are a variety of options. Unlike most WordPress plugins, Posts Table Pro Plugin is easy to use and works from the front-end. In this tutorial, we will outline how to use Posts Table Pro.

Keeping this plugin in mind, we have designed this simple guide.
We will walk you through:
- How to create a WordPress file manager
- Ways to upload files and add documents
Before starting the process, let’s take a quick look at the benefits of using Posts Table Pro.
Ease of use
A file manager sorts and stores a wide range of documents from spreadsheets to PDFs. For easy access, they are searchable. If someone is looking for a document, they can find it and even download it, if needed.
Allows shared access
File managers allow multiple users. You can also share documents or add more documents to a list.
Ease of organization
File managers sort and arrange documents based on custom taxonomies, categories, and tags. Thus, users can organize files the way they understand them better.
Display information of choice
File manager allows users to display information like thumbnails, date of creation, last updated, last downloaded, etc.
Intuitive and straightforward interface
A simple, front-end interface displays files in a tabular layout. It keeps the admin panel undisturbed and pristine, free from all sources of tampering.
A wide range of display options
Users have many choices such as:
- Making each document accessible via a free, unique link
- Documenting in WML, Dropbox, etc. and linking
- Users can directly download docs via page links
Now that we know that a file manager is a useful tool for information and organization management, let’s move on to the procedure for creating one for the WordPress site. As mentioned above, we will use the plugin Posts Table Pro’s example to explain.
Install and activate plugin Posts Table Pro
Posts Table Pro is a paid plugin. So, you must buy it before installation. You can go for a free trial before you commit.
Now, follow these steps to install and activate the plugin:
- Login to WordPress admin panel
- Go to Plugins
- Select ‘Add New’
- Click ‘Upload Plugin’
- Go to ‘Choose File’
- Find zip file for Posts Table Pro plugin
- Upload file
- Click ‘Install Now’ to install the plugin
- Activate Plugin button
- Go to Settings> Posts Table Pro and input the license key
- Click Save Changes
Now that it’s installed, let’s add documents and files.
Adding documents and files to the website
There are a few options for adding documents and files to your website. We explain them below.
Add docs using WordPress Download Manager
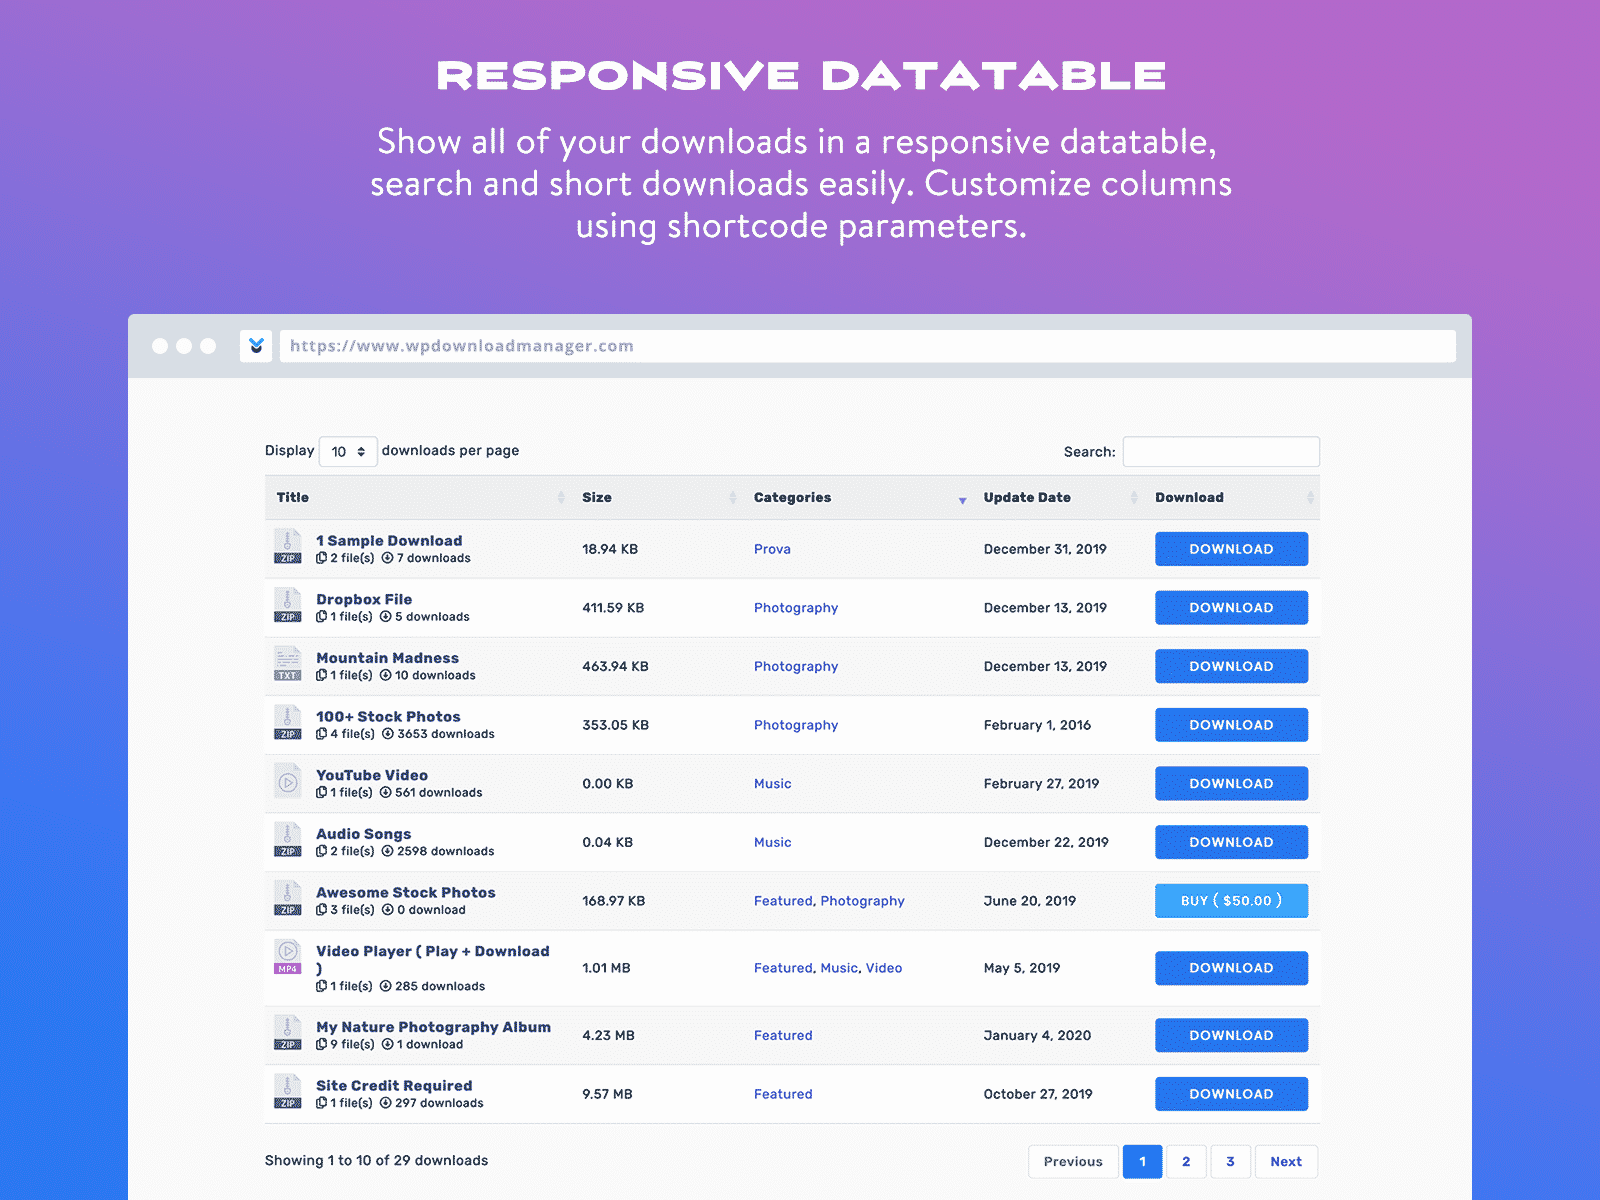
WordPress Download Manager is a plugin used for adding documents and performing other related file operations. As a part of the file system development process, the user can create categories and tags to organize the files and other documents uploaded. Next, users can upload documents on the file management system.
This method involves the following steps:
- Go to Plugins
- Click Add New
- Search for WordPress Downloader Manager plugin
- Install and activate it
- Go to Downloads>Categories
- On the categories page, you can customize categories.
- Using the Downloads>Tags path, the users can add tags.
- Next, go to Downloads>Add New to add files.
Advantages
- Categories and tags make the file you need easier to spot.
- The built-in custom post type makes adding docs a breeze.
- can see download history.
Shortcomings
- Custom field options are missing, so the user has to come up with their own.
- Cannot customize taxonomies
Adding Documents’ Attributes
WordPress Download Manager has set tags and taxonomies. Go to Add New File to add more attributes to your files.
- First, name the document with a suitable title.
- Then, upload a file by using the sidebar: Upload/Browse/URL box.
- Add Excerpt in the text box provided.
- Select categories and tags.
- A featured image can also be added.
When using the Classic Text Editor, additions happen in the main content area. In the case of the Gutenberg editor, updates happen in the Paragraph block.
Finally, to make the document accessible to site visitors, you must create a button or link. There are two ways.
Manually add: It is useful for non-developers. Insert a link into the document. This is downloaded to the WordPress file manager.
Users can create a link by adding an anchor text like ‘Download.’ Highlight it, and click the link icon available in the WordPress toolbar. URL is written as https://domain-name.com/?wpdmdl=filename
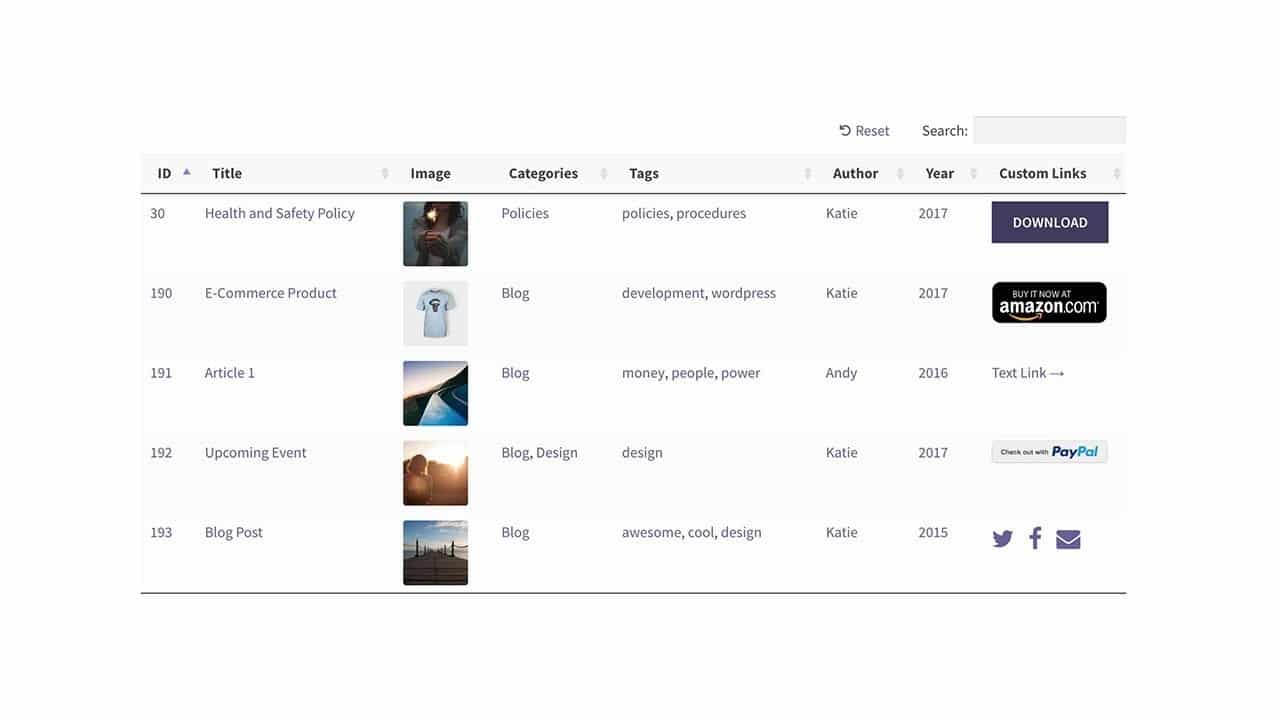
While using Posts Table Pro columns, you will see a column labeled ‘content.’ The column will display ‘Download Link.’
Program it: For developers, an automated way of creating links is helpful when the WordPress file manager has lots of files. Simply add a code snippet to the functions.php file in the parent theme.
This automatically adds a download link in the WordPress file manager’s ‘Content’ column. In the code snippet, you can replace ‘download’ with anchor text used for download links.
Creating a WordPress File Manager
Once you’ve installed and activated Posts Table Pro:
- Go to Pages and select Add New
- Create a new page to add a file manager
- Add shortcode using Classic Editor or Gutenberg.
Customize the table for better readability
- Set Columns to attributes like image, content: download link, title, excerpt
- Check if the Shortcodes checkbox is ticked off
- Search Filters are set to Custom from the drop-down menu
- Go to Custom Filters and input tax:wpdmcategory, tags
- Page length is set as Hidden
- Save Changes
Since there are multiple file manager categories, the users may need to list downloads for analytics purposes. Once you’ve done the above steps, you’ll see the downloads in the WordPress file manager. If you need to list downloads from a specific category, it is also possible. You can do it with the ‘term option’ in Posts Table Pro. Let’s put the specific category name as Listicles. The shortcode will look something like this:
[posts_table term=”wpdmcategory:listicles”]
Apart from a specific category, you can list downloads based on the date published, author, and other tags.
Create custom post types using Pods
Pods is a plugin available for free. You can customize post styles and assign taxonomical arrangements. The users can add custom fields that complement the chosen custom post type. Once Pods finishes its role by enabling you to add documents to custom post style, the Posts Table Pro can take over from here.
To add Pods plugin:
- Go to Plugins at WordPress Dashboard
- Search and Add Pods plugin
- After installation and activation, go to Pods Admin
- Click Add New and under this, go to Create New
- Select Custom Post Type option from Content type under Create New
- Now add singular and plural labels and name them as Document and Documents, respectively.
- Click Next Step
The Next Step is to Edit Pod. Here, you will find the Manage Fields tab. Click it and start adding as many custom fields as required.
These are essential steps involved. You also have Advanced Options under the built-in Taxonomies and Supports sections. The process is complete when you tick any of the features you want to add, such as Images, Featured Image, etc.
Advantages of this method
- In a custom post type, the user can add as many custom fields as desired. The user can upload the files’ characteristics like file size and type, etc., to differentiate one from the other.
- Users can control select fields like featured images and post excerpts.
- Easy to design custom taxonomies.
Shortcomings
- User cannot find who downloaded the files
- The user needs to create a custom post type first to start the document uploading process
Adding documents and files to custom post types
Adding documents and files to custom post types is the same as creating new posts or pages. The steps comprise:
- Go to Documents, and select Add New
- On the Add New screen, input documents’ information such as title, short description.
- Add additional data like taxonomies, featured image, custom fields, etc. to describe the document.
- Click Publish
Process to create the WordPress file manager
All the above subsections and steps help populate WordPress Sites with documents and file attributes. This helps retrieve and display documents. The process involves the following steps:
- Go to Pages and select ‘Add New’
- From here, you have two choices to follow to complete the process
Classic Editor: In Classic Editor, Click Insert Posts Table. It will embed a shortcode [posts_table] to the page
Gutenberg: It adds the [posts_table] shortcode to the Shortcode Block
It is how shortcode, and eventually, the Posts table is added to the page. As a result, the page starts displaying all files and documents in a tabular form.
Display documents directly from the front-end after uploading them to WordPress Media Library
In the above methods, the users must create the post to make it available for download. However, you can also display a post directly from the WordPress Media Library.
Other functions of WordPress File Manager
Apart from sorting and arranging the files and documents and presenting them in a tabular form, the WordPress File Manager can:
- Show who downloaded the files
- Offer control over the file accessors
- Allow users to add documents
- Sell downloadable documents, in case it is a WooCommerce site.
992 Replies to “How to Create a WordPress File Manager and Upload Files: A Detailed User Guide”
Leave a Reply
Recommended WordPress Hosting
Featured WordPress Plugin

Latest blog articles
- Best WordPress Theme for SEO Are you having trouble finding an appropriate theme for your website?
- How To Start A Fitness Blog; Steps And Recommendations Are you having trouble finding an appropriate theme for your website?
- Best Website Builder for Authors you should consider in 2021 Are you having trouble finding an appropriate theme for your website?
- Easy and Effective ways to create a Landing page in WordPress Are you having trouble finding an appropriate theme for your website?
- How to Add an Accordion in WordPress Are you having trouble finding an appropriate theme for your website?
- Top 5 PayPal Plugin For WordPress; Reviews, Pricing, And Comparison Are you having trouble finding an appropriate theme for your website?
When I initially commented I clicked the “Notify me when new comments are added” checkbox and now each time a comment is added I
get several emails with the same comment. Is there any way you can remove me from that service?
Appreciate it!
I love it when folks come together and share ideas.
Great website, keep it up!
you’re in point of fact a just right webmaster.
The web site loading speed is amazing. It kind of feels that you are
doing any distinctive trick. Furthermore, The contents are masterwork.
you have done a magnificent activity on this matter!
Hi there just wanted to give you a brief heads up and let you know a few
of the images aren’t loading correctly. I’m not
sure why but I think its a linking issue. I’ve tried it in two different web browsers and both show the same results.
Register and take part in the drawing, [url=https://profitspot.life/?u=2rek60a&o=y59p896]click here[/url]
[url=http://isotretinoin.skin/]accutane by mail[/url]
[url=https://vardenafil.skin/]vardenafil 10 mg[/url]
[url=http://cleocin.charity/]can i buy clindamycin cream over the counter[/url]
[url=http://augmentin.media/]amoxicillin 500mg 825 mg[/url]
[url=https://cleocin.charity/]clindamycin 450[/url]
[url=https://sildalisa.gives/]sildalis online[/url]
[url=http://clomida.foundation/]clomid 50 mg buy online[/url]
[url=https://furosemide.party/]lasix vs furosemide[/url]
[url=https://glucophage.foundation/]buy metformin mexico[/url]
[url=http://tadalafilvm.online/]female cialis generic[/url]
[url=https://elimite.science/]generic elimite[/url]
[url=http://sildalisa.gives/]sildalis 100mg 20mg[/url]
[url=https://tamoxifen.pics/]order tamoxifen[/url]
[url=https://augmentin.media/]how to get amoxicillin prescription[/url]
[url=https://malegra.science/]best price malegra fxt usa[/url]
[url=https://elimite.science/]elimite over the counter uk[/url]
[url=http://celecoxib.charity/]celebrex 200mg for sale[/url]
[url=http://tamoxifen.pics/]gynecomastia nolvadex[/url]
[url=http://isotretinoin.skin/]accutane price in india[/url]
best non prescription online pharmacies: overseas pharmacies shipping to usa – cheap prescriptions
[url=https://disulfiram.party/]antibuse[/url]
https://edpill.pro/# top rated ed pills
best ed medications cheap erectile dysfunction pill or best male enhancement pills
http://bolivianhomes.com/__media__/js/netsoltrademark.php?d=edpill.pro ed pills otc
[url=http://gaytravelbuddies.com/__media__/js/netsoltrademark.php?d=edpill.pro]cheap erectile dysfunction pills[/url] new ed pills and [url=https://www.clipsharelive.com/user/wmabtwab/videos]male erection pills[/url] new ed drugs
[url=https://amitriptyline.foundation/]purchase elavil without a prescription[/url]
[url=https://valacyclovir.party/]valtrex cream cost[/url]
http://edpill.pro/# generic ed drugs
http://fastpills.pro/# list of reputable canadian pharmacies
how to hack aviator aviator how to hack aviator
п»їerectile dysfunction medication best erection pills or best ed pills non prescription
http://www.anlanlin.com/__media__/js/netsoltrademark.php?d=edpill.pro medications for ed
[url=http://anatomist.com/__media__/js/netsoltrademark.php?d=edpill.pro]ed pills cheap[/url] best ed treatment and [url=https://tc.yuedotech.com/home.php?mod=space&uid=151414]ed pill[/url] cheapest ed pills
safe canadian pharmacy: safe online pharmacy – www canadianonlinepharmacy
http://birthcontrolpills.pro/# birth control pills prescription
п»їbuy birth control pills online: birth control pills delivery – over the counter birth control pills
https://birthcontrolpills.pro/# birth control pills online
cheapest pharmacy canada: canadian pharmacy shipping to USA – online canadian drugstore
buy drugs from canada [url=https://canadianpharm.pro/#]safe online pharmacy[/url] safe reliable canadian pharmacy
Paxlovid buy online: paxlovid covid – paxlovid price
http://canadianpharm.pro/# legitimate canadian pharmacy online
[url=https://antabuse.charity/]buy antabuse paypal[/url]
https://canadianpharm.pro/# canadian pharmacy near me
over the counter birth control pills: cheap birth control pills – birth control pills without seeing a doctor
canadian drug pharmacy real canadian pharmacy or the canadian pharmacy
http://charlesriverlabs.us/__media__/js/netsoltrademark.php?d=canadianpharm.pro reputable canadian pharmacy
[url=http://www.southbeachglow.com/__media__/js/netsoltrademark.php?d=canadianpharm.pro]canadian pharmacies comparison[/url] canada rx pharmacy and [url=http://www.aipeople.com.cn/home.php?mod=space&uid=2994355]thecanadianpharmacy[/url] canadian pharmacy 1 internet online drugstore
canadian pharmacy review reputable canadian pharmacy or canadian king pharmacy
http://kenkravitz.com/__media__/js/netsoltrademark.php?d=canadianpharm.pro canadianpharmacyworld com
[url=http://roseri.com/__media__/js/netsoltrademark.php?d=canadianpharm.pro]canadian pharmacy ed medications[/url] canadian mail order pharmacy and [url=http://fl.liaochengquan.cn/home.php?mod=space&uid=298655]trustworthy canadian pharmacy[/url] canadian pharmacies comparison
paxlovid covid: paxlovid covid – Paxlovid buy online
https://canadianpharm.pro/# medication canadian pharmacy
canadian pharmacy tampa: buying from canadian pharmacies – canadadrugpharmacy com
birth control pills [url=http://birthcontrolpills.pro/#]birth control pills without seeing a doctor[/url] birth control pills without seeing a doctor
https://canadianpharm.pro/# canadian pharmacy sarasota
price for birth control pills: price for birth control pills – over the counter birth control pills
paxlovid india: paxlovid generic – paxlovid pill
https://birthcontrolpills.pro/# over the counter birth control pills
canadian pharmacy king reviews canadian pharmacy prices or canadianpharmacyworld com
http://www.webtoolsfa.com/__media__/js/netsoltrademark.php?d=canadianpharm.pro canadian pharmacy world
[url=http://neapolitanische.pizza/__media__/js/netsoltrademark.php?d=canadianpharm.pro]77 canadian pharmacy[/url] my canadian pharmacy and [url=http://101.34.208.228/home.php?mod=space&uid=264187]canadian drugs online[/url] canadapharmacyonline com
legit canadian pharmacy: safe online pharmacy – canadian drugs
precription drugs from canada ordering drugs from canada or buy drugs from canada
http://ww35.travelocith.com/__media__/js/netsoltrademark.php?d=canadianpharm.pro is canadian pharmacy legit
[url=http://alexkelly.info/__media__/js/netsoltrademark.php?d=canadianpharm.pro]canadian pharmacy[/url] canada pharmacy online and [url=http://forum.meogames.com/home.php?mod=space&uid=8124294]best canadian pharmacy to order from[/url] reliable canadian pharmacy
http://paxlovid.pro/# paxlovid pill
canadian pharmacy world: safe online pharmacy – rate canadian pharmacies
http://paxlovid.pro/# paxlovid generic
legit canadian pharmacy online [url=https://canadianpharm.pro/#]canadian international pharmacy[/url] northern pharmacy canada
Paxlovid over the counter Paxlovid over the counter or paxlovid generic
http://coverspoker.com/__media__/js/netsoltrademark.php?d=paxlovid.pro paxlovid india
[url=http://frank-palme.com/__media__/js/netsoltrademark.php?d=paxlovid.pro]paxlovid pill[/url] paxlovid generic and [url=http://bbs.xiaoditech.com/home.php?mod=space&uid=1321899]paxlovid covid[/url] paxlovid price
paxlovid for sale: paxlovid cost without insurance – paxlovid cost without insurance
https://canadianpharm.pro/# legit canadian pharmacy online
canadian pharmacy prices: canadian international pharmacy – canadian compounding pharmacy
canadian pharmacy store canadian pharmacy ltd or canadian pharmacy reviews
http://ww17.puppetgifts.com/__media__/js/netsoltrademark.php?d=canadianpharm.pro canadian pharmacy oxycodone
[url=http://livesmarteatsmart.com/__media__/js/netsoltrademark.php?d=canadianpharm.pro]vipps approved canadian online pharmacy[/url] canadian pharmacy checker and [url=http://www.troutpredator.com/community/member.php?u=210834]online canadian pharmacy reviews[/url] canadian pharmacy price checker
Today, I went to the beachfront with my kids. I found a sea shell and gave it to my 4 year old daughter and said “You can hear the ocean if you put this to your ear.” She put the shell to her ear and screamed. There was a hermit crab inside and it pinched her ear. She never wants to go back! LoL I know this is entirely off topic but I had to tell someone!
canadian drug prices: certified online pharmacy canada – canada ed drugs
http://paxlovid.pro/# paxlovid price
[url=https://zanaflextizanidine.gives/]zanaflex for migraines[/url]
[url=http://clomidv.online/]clomd[/url]
canadian king pharmacy best canadian pharmacy to order from or canadian pharmacy meds reviews
http://igoonlinebanking.com/__media__/js/netsoltrademark.php?d=canadianpharm.pro canadian pharmacy cheap
[url=http://monarchgracebay.com/__media__/js/netsoltrademark.php?d=canadianpharm.pro]legal canadian pharmacy online[/url] certified canadian international pharmacy and [url=http://qihuo.org.cn/space-uid-190075.html]onlinecanadianpharmacy 24[/url] canadian drugs pharmacy
http://paxlovid.pro/# paxlovid cost without insurance
best canadian online pharmacy: certified online pharmacy canada – canadian drug prices
paxlovid covid: paxlovid cost without insurance – Paxlovid buy online
https://paxlovid.pro/# paxlovid generic
paxlovid covid paxlovid buy or paxlovid india
http://turboencabulated.com/__media__/js/netsoltrademark.php?d=paxlovid.pro п»їpaxlovid
[url=http://watchfreetv.com/__media__/js/netsoltrademark.php?d=paxlovid.pro]buy paxlovid online[/url] п»їpaxlovid and [url=http://bbs.xinhaolian.com/home.php?mod=space&uid=1916233]п»їpaxlovid[/url] paxlovid for sale
[url=http://ilyrica.com/]lyrica 200[/url]
canadian drug pharmacy buy drugs from canada or canadian pharmacy india
http://crimea.org/__media__/js/netsoltrademark.php?d=canadianpharm.pro online pharmacy canada
[url=http://eldercaremediationassociates.com/__media__/js/netsoltrademark.php?d=canadianpharm.pro]reputable canadian pharmacy[/url] onlinecanadianpharmacy 24 and [url=http://bbs.zhizhuyx.com/home.php?mod=space&uid=7823284]online canadian pharmacy reviews[/url] best canadian online pharmacy
cheap birth control pills: birth control pills without seeing a doctor – price for birth control pills
https://birthcontrolpills.pro/# buy birth control over the counter
birth control pills without seeing a doctor: birth control pills online – birth control pills cost
http://birthcontrolpills.pro/# birth control pills online
canadian compounding pharmacy global pharmacy canada or canadian pharmacy meds
http://harwellhamiltonharris.org/__media__/js/netsoltrademark.php?d=canadianpharm.pro cheap canadian pharmacy
[url=http://eznettitle.com/__media__/js/netsoltrademark.php?d=canadianpharm.pro]best rated canadian pharmacy[/url] is canadian pharmacy legit and [url=http://www.9yuanmoli.com/bbs/home.php?mod=space&uid=314927]canadian pharmacy[/url] best online canadian pharmacy
buy paxlovid online: paxlovid price – paxlovid india
Paxlovid buy online [url=http://paxlovid.pro/#]Paxlovid buy online[/url] paxlovid cost without insurance
birth control pills prescription: cheap birth control pills – price for birth control pills
http://paxlovid.pro/# paxlovid cost without insurance
birth control pills cost: birth control pills cost – cheap birth control pills
https://birthcontrolpills.pro/# birth control pills delivery
legal canadian pharmacy online canada pharmacy or safe canadian pharmacy
http://minutesrecharge.net/__media__/js/netsoltrademark.php?d=canadianpharm.pro canadianpharmacyworld com
[url=http://testmastersact.com/__media__/js/netsoltrademark.php?d=canadianpharm.pro]canadian pharmacy oxycodone[/url] canada drugstore pharmacy rx and [url=http://www.empyrethegame.com/forum/memberlist.php?mode=viewprofile&u=256370]canadian discount pharmacy[/url] northwest canadian pharmacy
paxlovid generic paxlovid cost without insurance or paxlovid pill
http://tonywho.com/__media__/js/netsoltrademark.php?d=paxlovid.pro paxlovid pharmacy
[url=http://siggadesign.com/__media__/js/netsoltrademark.php?d=paxlovid.pro]paxlovid india[/url] paxlovid india and [url=https://98e.fun/space-uid-5884686.html]Paxlovid buy online[/url] paxlovid generic
[url=http://erectafil.foundation/]erectafil 10[/url]
birth control pills buy: birth control pills – birth control pills
ed meds online: generic ed pills – ed medication online
best online pharmacies in mexico [url=http://mexicanpharmacy.life/#]mexican pharmaceuticals online[/url] mexican online pharmacies prescription drugs
http://mexicanpharmacy.life/# mexican drugstore online
http://indiapharmacy.world/# buy prescription drugs from india
purple pharmacy mexico price list: mexican rx online – buying prescription drugs in mexico
pharmacies in mexico that ship to usa: medicine in mexico pharmacies – mexican border pharmacies shipping to usa
https://edpills24.pro/# men’s ed pills
https://indiapharmacy.world/# online pharmacy india
erectile dysfunction medicines: erection pills – best ed pill
[url=http://cialis.skin/]tadalafil 20mg best price[/url]
https://indiapharmacy.world/# top online pharmacy india
http://edpills24.pro/# best non prescription ed pills
cures for ed ed pill or mens ed pills
http://projectpromise.com/__media__/js/netsoltrademark.php?d=edpills24.pro best male ed pills
[url=http://captrustpro.net/__media__/js/netsoltrademark.php?d=edpills24.pro"]cheap erectile dysfunction pills[/url] mens erection pills and [url=http://517nn.com/home.php?mod=space&uid=303942]cheap ed drugs[/url] ed treatments
india online pharmacy [url=http://indiapharmacy.world/#]reputable indian online pharmacy[/url] indian pharmacy online
online ed medications medicine erectile dysfunction or erectile dysfunction medicines
http://ww5.stolenbikes.com/__media__/js/netsoltrademark.php?d=edpills24.pro best ed treatment pills
[url=http://888-abc-4car.net/__media__/js/netsoltrademark.php?d=edpills24.pro]best ed treatment pills[/url] medications for ed and [url=https://www.foodntours.com/user/dcyrhheq/videos]cures for ed[/url] gnc ed pills
best online pharmacies in mexico: п»їbest mexican online pharmacies – pharmacies in mexico that ship to usa
[url=https://budesonide.science/]budesonide 500 mcg[/url]
medication from mexico pharmacy mexican mail order pharmacies or purple pharmacy mexico price list
http://winnersclub.com/__media__/js/netsoltrademark.php?d=mexicanpharmacy.life mexico drug stores pharmacies
[url=http://www.chelseaclub.com/__media__/js/netsoltrademark.php?d=mexicanpharmacy.life]mexican border pharmacies shipping to usa[/url] pharmacies in mexico that ship to usa and [url=http://forum.meogames.com/home.php?mod=space&uid=8220577]buying prescription drugs in mexico[/url] mexican drugstore online
mexican border pharmacies shipping to usa: buying from online mexican pharmacy – mexico drug stores pharmacies
https://mexicanpharmacy.life/# mexican pharmaceuticals online
reputable indian online pharmacy best online pharmacy india or indian pharmacy paypal
http://retailstorecontractors.com/__media__/js/netsoltrademark.php?d=indiapharmacy.world Online medicine order
[url=http://creditmonitor.net/__media__/js/netsoltrademark.php?d=indiapharmacy.world]п»їlegitimate online pharmacies india[/url] buy medicines online in india and [url=http://plixsite.net/forum/member.php?action=profile&uid=2244112]Online medicine home delivery[/url] Online medicine home delivery
https://edpills24.pro/# new ed pills
india pharmacy mail order: top 10 online pharmacy in india – top 10 online pharmacy in india
https://edpills24.pro/# treatment for ed
ed medication online ed pills for sale or pills for ed
http://veracityassets.com/__media__/js/netsoltrademark.php?d=edpills24.pro otc ed pills
[url=http://sacredearthmagazine.com/__media__/js/netsoltrademark.php?d=edpills24.pro]ed medications list[/url] best treatment for ed and [url=http://www.9kuan9.com/home.php?mod=space&uid=85092]ed meds online without doctor prescription[/url] buy erection pills
buy prescription drugs from india: india pharmacy – indian pharmacy online
best ed pills at gnc [url=https://edpills24.pro/#]best medication for ed[/url] best ed pills
http://edpills24.pro/# male ed drugs
best ed treatment: drugs for ed – over the counter erectile dysfunction pills
best ed pills non prescription ed meds or natural remedies for ed
http://employeesmortgagecenter.com/__media__/js/netsoltrademark.php?d=edpills24.pro cheap ed drugs
[url=http://wylerracing.com/__media__/js/netsoltrademark.php?d=edpills24.pro]best ed medication[/url] male ed pills and [url=http://www.9yuanmoli.com/bbs/home.php?mod=space&uid=320133]best over the counter ed pills[/url] non prescription ed drugs
mexican online pharmacies prescription drugs mexican drugstore online or medicine in mexico pharmacies
http://spaatloscaballeros.com/__media__/js/netsoltrademark.php?d=mexicanpharmacy.life mexican border pharmacies shipping to usa
[url=http://californiaappeals.net/__media__/js/netsoltrademark.php?d=mexicanpharmacy.life]medicine in mexico pharmacies[/url] mexican online pharmacies prescription drugs and [url=http://www.visionzone.com.cn/home.php?mod=space&uid=2037474]purple pharmacy mexico price list[/url] buying from online mexican pharmacy
https://edpills24.pro/# non prescription ed drugs
https://mexicanpharmacy.life/# medicine in mexico pharmacies
online shopping pharmacy india reputable indian online pharmacy or best india pharmacy
http://rockpointlogistics.net/__media__/js/netsoltrademark.php?d=indiapharmacy.world india pharmacy mail order
[url=http://pinkpalaceeurope.com/__media__/js/netsoltrademark.php?d=indiapharmacy.world]reputable indian pharmacies[/url] world pharmacy india and [url=http://www.jcdqzdh.com/home.php?mod=space&uid=223176]Online medicine order[/url] indianpharmacy com
top ed drugs: medications for ed – ed drugs list
[url=http://paxild.online/]how much is paxil[/url]
impotence pills: ed pills gnc – treatments for ed
https://mexicanpharmacy.life/# mexico drug stores pharmacies
[url=https://indocina.online/]indocin 25[/url]
top rated ed pills mens ed pills or generic ed drugs
http://assortedsundries.com/__media__/js/netsoltrademark.php?d=edpills24.pro best treatment for ed
[url=http://forpeoplewhodontlikehospitals.net/__media__/js/netsoltrademark.php?d=edpills24.pro]male ed drugs[/url] new ed pills and [url=https://masterbationtube.com/user/pcxkaycu/videos]ed pills that really work[/url] ed medications
http://indiapharmacy.world/# п»їlegitimate online pharmacies india
online pharmacy india [url=http://indiapharmacy.world/#]mail order pharmacy india[/url] indian pharmacies safe
[url=https://piroxicam.foundation/]piroxicam medicine[/url]
[url=http://motrin.charity/]motrin 500[/url]
medication from mexico pharmacy mexican drugstore online or medicine in mexico pharmacies
http://larrytoepper.com/__media__/js/netsoltrademark.php?d=mexicanpharmacy.life mexican mail order pharmacies
[url=http://nolawatson.com/__media__/js/netsoltrademark.php?d=mexicanpharmacy.life]pharmacies in mexico that ship to usa[/url] best online pharmacies in mexico and [url=http://www.chaoren.group/home.php?mod=space&uid=583383]buying prescription drugs in mexico[/url] pharmacies in mexico that ship to usa
http://edpills24.pro/# ed medications
top rated ed pills pills for erection or ed medications list
http://retirementfundingnow.com/__media__/js/netsoltrademark.php?d=edpills24.pro cheap erectile dysfunction pills online
[url=http://www.houstonexpo.com/__media__/js/netsoltrademark.php?d=edpills24.pro]pills for ed[/url] top ed drugs and [url=https://forexzloty.pl/members/294482-gzounzio]herbal ed treatment[/url] cheap erectile dysfunction pills online
http://mexicanpharmacy.life/# п»їbest mexican online pharmacies
mexico pharmacies prescription drugs: mexican drugstore online – best online pharmacies in mexico
best india pharmacy india online pharmacy or Online medicine order
http://therealtemasekreview.com/__media__/js/netsoltrademark.php?d=indiapharmacy.world reputable indian pharmacies
[url=http://gotovdp.com/__media__/js/netsoltrademark.php?d=indiapharmacy.world]buy prescription drugs from india[/url] online pharmacy india and [url=http://lsdsng.com/user/462452]reputable indian online pharmacy[/url] online shopping pharmacy india
ed meds online: top rated ed pills – erectile dysfunction pills
http://edpills24.pro/# best erectile dysfunction pills
http://indiapharmacy.world/# indian pharmacy online
ed pills gnc treatment for ed or top erection pills
http://remarkansas.com/__media__/js/netsoltrademark.php?d=edpills24.pro best non prescription ed pills
[url=http://njcourtsonline.cc/__media__/js/netsoltrademark.php?d=edpills24.pro]male ed pills[/url] best drug for ed and [url=http://www.aipeople.com.cn/home.php?mod=space&uid=3027943]what is the best ed pill[/url] ed treatments
mexican mail order pharmacies [url=https://mexicanpharmacy.life/#]п»їbest mexican online pharmacies[/url] mexican border pharmacies shipping to usa
mexican online pharmacies prescription drugs mexico pharmacies prescription drugs or mexican online pharmacies prescription drugs
http://ww35.modelswatch.com/__media__/js/netsoltrademark.php?d=mexicanpharmacy.life buying prescription drugs in mexico online
[url=http://dermz.com/__media__/js/netsoltrademark.php?d=mexicanpharmacy.life]mexico drug stores pharmacies[/url] reputable mexican pharmacies online and [url=http://www.jbt4.com/home.php?mod=space&uid=8453305]medicine in mexico pharmacies[/url] medicine in mexico pharmacies
mexican drugstore online: mexican mail order pharmacies – mexican mail order pharmacies
[url=http://erectafil.foundation/]buy erectafil 20[/url]
https://mexicanpharmacy.life/# buying prescription drugs in mexico
http://mexicanpharmacy.life/# medicine in mexico pharmacies
buying prescription drugs in mexico: medicine in mexico pharmacies – mexico drug stores pharmacies
ed medication online impotence pills or ed meds
http://resolutionworldwide.com/__media__/js/netsoltrademark.php?d=edpills24.pro over the counter erectile dysfunction pills
[url=http://delooper.org/__media__/js/netsoltrademark.php?d=edpills24.pro]treatment for ed[/url] top ed pills and [url=http://byauto.net/home.php?mod=space&uid=628307]treatment for ed[/url] best ed pills
If some one wants to be updated with latest technologies afterward he must be pay a quick visit this
website and be up to date daily.
[url=http://alburol.online/]albuterol ipratropium[/url]
best ed pills non prescription: ed remedies – online ed medications
http://indiapharmacy.world/# pharmacy website india
http://indiapharmacy.world/# india pharmacy mail order
ed medications best non prescription ed pills or cheap erectile dysfunction pills
http://stpetephysician.com/__media__/js/netsoltrademark.php?d=edpills24.pro buy ed pills
[url=http://thisweekfanpage.com/__media__/js/netsoltrademark.php?d=edpills24.pro]ed pills that really work[/url] medication for ed and [url=http://www.9kuan9.com/home.php?mod=space&uid=85166]male erection pills[/url] best ed medications
world pharmacy india Online medicine home delivery or cheapest online pharmacy india
http://www.bpcitigroupcenter.com/__media__/js/netsoltrademark.php?d=indiapharmacy.world/ indianpharmacy com
[url=http://shufunilive.com/__media__/js/netsoltrademark.php?d=indiapharmacy.world]indianpharmacy com[/url] buy prescription drugs from india and [url=http://83783.net/home.php?mod=space&uid=6558687]top 10 online pharmacy in india[/url] Online medicine order
non prescription ed pills [url=https://edpills24.pro/#]best non prescription ed pills[/url] ed pills that work
online shopping pharmacy india: online pharmacy india – indian pharmacy online
http://mexicanpharmacy.life/# mexican mail order pharmacies
buying from online mexican pharmacy mexico drug stores pharmacies or mexican online pharmacies prescription drugs
http://setacla.org/__media__/js/netsoltrademark.php?d=mexicanpharmacy.life pharmacies in mexico that ship to usa
[url=http://peiweimarketplace.co/__media__/js/netsoltrademark.php?d=mexicanpharmacy.life]mexico drug stores pharmacies[/url] buying prescription drugs in mexico online and [url=https://www.warshipsfaq.ru/user/sxlnrysm]mexico pharmacies prescription drugs[/url] mexican rx online
mexican mail order pharmacies: best online pharmacies in mexico – п»їbest mexican online pharmacies
https://mexicanpharmacy.life/# medication from mexico pharmacy
erection pills cure ed or best treatment for ed
http://eagleeyestv.com/__media__/js/netsoltrademark.php?d=edpills24.pro non prescription ed pills
[url=http://michiganmediationservices.com/__media__/js/netsoltrademark.php?d=edpills24.pro]best ed pills[/url] ed treatment pills and [url=http://www.1nanspa.com/space-uid-2870.html]new treatments for ed[/url] cheapest ed pills
molnupiravir ivermectin Molnupiravir price
https://molnupiravir.life/# merck covid
https://lisinopril.icu/# medication lisinopril 20 mg
molnupiravir uk molnupiravir for sale
[url=https://molnupiravir.life/#]molnupiravir for sale[/url] where can i buy lopinavir
cost of prednisone 40 mg buy Prednisone 20mg
https://lisinopril.icu/# lisinopril 10mg online
https://molnupiravir.life/# merck covid treatment
prinivil 10 mg tablet lisinopril tabs 20mg or buy zestril
http://adssglobal.com/__media__/js/netsoltrademark.php?d=lisinopril.icu lisinopril 20 mg for sale
[url=http://brookebloom.com/__media__/js/netsoltrademark.php?d=lisinopril.icu]lisinopril hctz[/url] lisinopril 2mg tablet and [url=https://www.clipsharelive.com/user/lrtgrytp/videos]lisinopril tablets for sale[/url] lisinopril sale
[url=https://zanaflextizanidine.gives/]buy zanaflex australia[/url]
generic clomid clomid without prescription
https://ciprofloxacin.icu/# cipro pharmacy
buy molnupiravir online merck covid treatment or molnupiravir 200mg
http://www.qaquestions.com/__media__/js/netsoltrademark.php?d=molnupiravir.life molnupiravir buy online
[url=http://esri-japan.com/__media__/js/netsoltrademark.php?d=molnupiravir.life]molnupiravir antiviral drug[/url] molnupiravir stock and [url=http://lsdsng.com/user/463930]antiviral drug molnupiravir[/url] molnupiravir order online
prednisone 50 mg canada prednisone for sale online
clomid for sale generic for clomid or clomid order online
http://ww17.mrsdcrochets.com/__media__/js/netsoltrademark.php?d=clomiphenecitrate.pro clomiphene for sale
[url=http://www.perimeterdefense.net/__media__/js/netsoltrademark.php?d=clomiphenecitrate.pro]clomid generic[/url] where can i buy clomiphene and [url=http://www.9kuan9.com/home.php?mod=space&uid=87858]clomiphene tablets[/url] clomid uk
https://molnupiravir.life/# molnupiravir capsules 200 mg price in india
https://clomiphenecitrate.pro/# clomiphene for sale
[url=https://molnupiravir.life/#]where can i buy lopinavir[/url] molnupiravir generic
where to get prednisone buy Prednisone over the counter
https://molnupiravir.life/# molnupiravir brand name
[url=https://tenormin.science/]atenolol 12.5 mg daily[/url]
prednisone canada prices prednisone over the counter australia or prednisone canada prescription
http://elpennysaver.com/__media__/js/netsoltrademark.php?d=prednisone.pro pharmacy cost of prednisone
[url=http://gardsjon.com/__media__/js/netsoltrademark.php?d=prednisone.pro]prednisone medication[/url] 20 mg of prednisone and [url=http://fl.liaochengquan.cn/home.php?mod=space&uid=300286]prednisone uk buy[/url] prednisone 10 mg
https://ciprofloxacin.icu/# buy cipro online usa
molnupiravir vendita online merck covid drug
[url=http://meftormin.com/]glucophage 850 price[/url]
molnupiravir antiviral drug Molnupiravir price
https://prednisone.pro/# generic prednisone pills
https://molnupiravir.life/# molnupiravir tablets
clomid treats clomid without prescription
lisinopril tabs 4mg zestril discount or zestril lisinopril
http://freeguitarlesssons.com/__media__/js/netsoltrademark.php?d=lisinopril.icu lisinopril 10 mg
[url=http://crawfordfreightsystems.com/__media__/js/netsoltrademark.php?d=lisinopril.icu]lisinopril 102[/url] zestril 5 mg india and [url=http://www.80tt1.com/home.php?mod=space&uid=50707]lisinopril tabs 88mg[/url] lisinopril 40 mg without prescription
molnupiravir medicine molnupiravir covid price or molnupiravir coronavirus
http://bibleonradio.org/__media__/js/netsoltrademark.php?d=molnupiravir.life molnupiravir kaufen
[url=http://www.ralphsappliances.com/__media__/js/netsoltrademark.php?d=molnupiravir.life]molnupiravir kaufen deutschland[/url] molnupiravir kaufen amazon and [url=http://www.aipeople.com.cn/home.php?mod=space&uid=3066881]monulpiravir[/url] molnupiravir vendita online
clomid pills buy clomid or no prescription clomid
http://suki.life/__media__/js/netsoltrademark.php?d=clomiphenecitrate.pro buy clomid
[url=http://joelphillips.com/__media__/js/netsoltrademark.php?d=clomiphenecitrate.pro]buy clomid online no prescription[/url] clomid cost and [url=http://mb.lckpw.org/home.php?mod=space&uid=9888980]clomid online no prescription[/url] clomid 50 mg
[url=https://ciprofloxacin.icu/#]antibiotics cipro[/url] cipro ciprofloxacin
https://lisinopril.icu/# lisinopril 40 mg no prescription
https://certifiedpharmacy.pro/# buy prescription drugs without doctor
paxlovid for sale paxlovid price
https://certifiedpharmacy.pro/# india online pharmacy
[url=http://lyricaf.com/]lyrica drug cost[/url]
paxlovid buy Paxlovid buy online
[url=https://certifiedpharmacy.pro/#]mail order prescription drugs from canada[/url] pharmacy online canada
[url=https://synthroid.charity/]synthroid 0.050[/url]
https://certifiedpharmacy.pro/# list of aarp approved pharmacies
https://canadianpharmacy.legal/# ed meds online canada
online pharmacy canada precription drugs from canada
https://certifiedpharmacy.pro/# most popular canadian pharmacy
paxlovid pharmacy paxlovid generic
https://certifiedpharmacy.pro/# prescription drugs online without
legit canadian pharmacy reliable canadian pharmacy
[url=https://certifiedpharmacy.pro/#]certified canadian international pharmacy[/url] drugs from canada without prescription
https://paxlovid.store/# paxlovid covid
list of canadian pharmacy certified canadian international pharmacy
online canadian pharmacy canadian drugs pharmacy or canadian pharmacy victoza
http://uhseast.com/__media__/js/netsoltrademark.php?d=canadianpharmacy.legal canadian medications
[url=http://ulitsasesam.net/__media__/js/netsoltrademark.php?d=canadianpharmacy.legal]canadian pharmacy drugs online[/url] best canadian pharmacy to buy from and [url=http://bbs.zhizhuyx.com/home.php?mod=space&uid=7972831]canadian pharmacy checker[/url] canada rx pharmacy world
[url=https://stromectol.download/]buy stromectol[/url]
[url=http://tadafil.com/]cialis best online[/url]
[url=http://diflucan.science/]diflucan 500 mg[/url]
[url=https://duloxetine.foundation/]cymbalta 9542[/url]
[url=https://hydroxyzine.party/]atarax 100mg tablets[/url]
[url=https://triamterene.charity/]triamterene hctz 75 50[/url]
[url=https://onlinedrugstore.science/]generic pharmacy online[/url]
[url=http://hydroxyzine.party/]buy atarax[/url]
[url=http://azithromycin.solutions/]cheap zithromax pills[/url]
[url=http://metformin.party/]metformin from mexico to us[/url]
[url=https://azithromycin.solutions/]buy azithromycin india[/url]
[url=https://nolvadextn.online/]buy online nolvadex[/url]
[url=https://atenolola.charity/]atenolol 100 mg for sale[/url]
[url=http://metformin.party/]metformin where to get[/url]
[url=https://bactrim.gives/]bactrim pills for sale[/url]
[url=https://onlinedrugstore.science/]my canadian pharmacy rx[/url]
[url=http://prednisolone.solutions/]prednisolone for sale in uk[/url]
[url=http://duloxetine.foundation/]buy cymbalta online cheap[/url]
[url=http://atenolola.charity/]atenolol 50 mg[/url]
[url=https://pharmacyonline.science/]online pharmacy ed[/url]
[url=http://azithromycin.solutions/]azithromycin 500 mg tablet price in india[/url]
[url=http://baclofen.party/]baclofen for sale[/url]
[url=https://cialisonlinedrugstore.charity/]mexico rx tadalafil[/url]
[url=https://cialisonlinedrugstore.charity/]tadalafil 10 mg coupon[/url]
[url=http://hydroxyzine.party/]can you buy atarax over the counter uk[/url]
[url=http://duloxetine.foundation/]buy cymbalta canada[/url]
[url=http://hydroxyzine.party/]atarax 25 mg prescription[/url]
[url=http://toradola.gives/]toradol medication[/url]
[url=http://vermox.charity/]vermox 100mg tablets[/url]
[url=https://tretinon.online/]retin a cream for sale[/url]
[url=https://atenolola.charity/]atenolol 6.25 mg[/url]
[url=http://atenolola.charity/]atenolol tablets 25mg online[/url]
[url=https://tretinon.online/]buy tretinoin over the counter[/url]
[url=http://cialisonlinedrugstore.charity/]tadalafil capsules for sale[/url]
[url=http://pharmacyonline.science/]canadapharmacyonline[/url]
[url=http://atenolola.charity/]atenolol brand name in india[/url]
[url=https://atenolola.charity/]atenolol pills 25mg[/url]
[url=https://triamterene.charity/]generic triamterene[/url]
[url=https://pharmacyonline.science/]indian pharmacy[/url]
[url=http://lipitor.charity/]lipitor 4 mg[/url]
[url=http://levofloxacin.science/]ebaylevaquin[/url]
[url=https://atenolola.charity/]atenolol 50 mg tablet price in india[/url]
[url=https://dipyridamole.charity/]generic dipyridamole[/url]
[url=https://triamterene.charity/]triamterene 37.5mg hctz 25mg caps[/url]
[url=http://bactrim.download/]generic of bactrim[/url]
[url=http://acutanetab.online/]order accutane no prescription[/url]
[url=http://lisinopril.party/]zestril coupon[/url]
[url=http://atomoxetine.pics/]strattera 40 mg pills generic[/url]
[url=https://clopidogrel.party/]buy plavix in india[/url]
[url=https://zanaflex.pics/]rx tizanidine[/url]
[url=http://phenergan.download/]phenergan over the counter usa[/url]
[url=http://finasteride.skin/]order propecia online no prescription[/url]
[url=https://amoxicillincps.online/]augmentin 375mg tablets[/url]
[url=https://doxycyclinetl.online/]doxycycline 50 mg price[/url]
[url=http://zanaflex.pics/]zanaflex capsules 4mg[/url]
[url=https://amoxicillincps.online/]how can i get amoxicillin in uk[/url]
[url=http://difluca.com/]diflucan 150 mg otc[/url]
[url=http://hydroxychloroquine.best/]plaquenil headache[/url]
[url=http://acutanetab.online/]accutane online pharmacy[/url]
[url=https://difluca.com/]diflucan uk price[/url]
[url=http://lisinopril.party/]lisinopril 10 mg online[/url]
[url=https://happyfamilyonlinepharmacy.net/]canadian pharmacy no scripts[/url]
[url=http://clopidogrel.party/]plavix discount[/url]
[url=https://trimox.science/]amoxil 500mg[/url]
[url=https://bactrim.download/]order bactrim on line[/url]
[url=http://acutanetab.online/]accutane india[/url]
[url=https://deltasone.skin/]prednisone 10 mg tablet cost[/url]
[url=https://prednisome.com/]prednisone 5442[/url]
[url=https://diclofenac.pics/]order voltaren gel[/url]
[url=https://cephalexin.party/]keflex price canada[/url]
[url=http://diflucanfns.online/]diflucan 200 mg tabs[/url]
[url=http://albuterolx.com/]ventolin cost usa[/url]
[url=https://finasteride.skin/]propecia 1mg price[/url]
[url=http://finasteride.skin/]propecia generic best price[/url]
[url=http://suhagra.party/]suhagra 50 mg tablet online purchase[/url]
[url=http://zanaflex.pics/]zanaflex for fibromyalgia[/url]
[url=https://azithromycind.online/]azithromycin no prescription[/url]
[url=https://trimox.science/]augmentin otc[/url]
[url=https://bactrim.download/]bactrim buy[/url]
[url=https://doxycyclinetl.online/]doxycycline 40 mg generic cost[/url]
[url=https://baclofentm.online/]baclofen 10 mgs no prescription[/url]
[url=http://netformin.com/]glucophage cost uk[/url]
[url=https://tetracycline.trade/]how much is tetracycline[/url]
[url=https://albendazole.science/]albenza for parasites[/url]
[url=http://netformin.com/]metformin from mexico[/url]
[url=https://duloxetine.science/]buy cymbalta from canada[/url]
[url=http://modafinil.science/]modafinil fast shipping[/url]
[url=http://amoxicillin.run/]buy cheap augmentin online[/url]
[url=https://vermox.download/]vermox pharmacy[/url]
[url=https://ventolin.science/]combivent cost[/url]
[url=http://ventolin.science/]0.5 albuterol[/url]
[url=https://acyclovir.science/]acyclovir 300 mg[/url]
[url=http://finasteride.media/]propecia where to buy australia[/url]
[url=https://finasteride.media/]order propecia no prescription[/url]
[url=https://sildalis.party/]sildalis india[/url]
[url=http://silagra.science/]silagra tablets[/url]
[url=http://flomaxp.com/]flomax otc uk[/url]
[url=http://duloxetine.science/]cymbalta price without insurance[/url]
[url=https://fluoxetine.science/]buy fluoxetine uk[/url]
[url=http://gabapentin.science/]neurontin 200 mg price[/url]
[url=http://finasteride.media/]how to get propecia cheap[/url]
[url=https://antabuse.science/]antabuse for sale uk[/url]
[url=https://amoxicillin.run/]augmentin 875 mg 125 mg tablet[/url]
[url=http://celecoxib.science/]celebrex cost in mexico[/url]
[url=https://amoxicillin.run/]generic amoxicillin 875 mg[/url]
[url=http://silagra.trade/]silagra 50 mg india[/url]
[url=http://netformin.com/]glucophage uk[/url]
[url=http://gabapentin.science/]neurontin gabapentin[/url]
[url=http://isotretinoin.science/]cost of generic accutane[/url]
[url=https://zithromaxc.online/]zithromax z pack[/url]
[url=https://tetracycline.trade/]tetracycline 500 mg brand name[/url]
[url=http://vermox.trade/]online pharmacy vermox[/url]
[url=https://avaltrex.com/]valtrex 1000 mg[/url]
[url=http://nolvadextam.online/]buy nolvadex tablets[/url]
[url=http://prednisolone.media/]where to buy prednisolone[/url]
[url=https://happyfamilystorex.online/]list of online pharmacies[/url]
[url=https://azithromycinanc.online/]azithromycin australia online[/url]
[url=https://vermox.trade/]vermox pills for sale[/url]
[url=http://clonidine.africa/]clonidine hcl 0.2 mg[/url]
[url=http://amoxicillinf.com/]20 mg amoxicillin[/url]
[url=https://lasixpx.online/]lasix loop diuretic[/url]
[url=https://escitalopram.party/]lexapro prescription[/url]
[url=https://happyfamilystorex.online/]medical mall pharmacy[/url]
[url=https://diflucan.business/]buy fluconazole no rx[/url]
[url=http://lasixmb.online/]furosemide 25 mg tablet[/url]
[url=https://toradol.party/]toradol online pharmacy[/url]
[url=http://trazodone.pics/]trazodone 150 mg price[/url]
[url=http://fluconazole.party/]how much is diflucan[/url]
[url=https://amoxicillinf.com/]price for amoxil[/url]
[url=http://azithromycinanc.online/]buy azithromycin over the counter[/url]
[url=http://atomoxetine.trade/]strattera 44 online[/url]
[url=http://trazodone.pics/]550 mg trazodone[/url]
[url=http://imetformin.online/]canada pharmacy glucophage[/url]
[url=https://furosemide.science/]lasix 40 mg daily[/url]
[url=http://bactrim.pics/]where can i get bactrim[/url]
[url=https://furosemide.science/]furosemide 40mg tab without prescription[/url]
[url=http://clonidine.africa/]clonidine prescription medication[/url]
[url=http://accutn.com/]buy accutane online nz[/url]
[url=https://avaltrex.com/]valtrex generic canada[/url]
[url=http://fluconazole.party/]order diflucan online canada[/url]
[url=http://metforminb.com/]glucophage 500mg price in india[/url]
[url=http://toradol.download/]toradol for tooth pain[/url]
[url=http://diflucan.business/]how can i get diflucan over the counter[/url]
[url=http://azithromycinanc.online/]where can i get azithromycin tablets[/url]
[url=http://toradol.party/]toradol 15 mg[/url]
[url=http://celebrex.today/]celebrex medicine price[/url]
[url=https://prednisolone.today/]prednisolone sodium[/url]
[url=http://sildenafil.business/]viagra for sale canada[/url]
[url=https://lisinopril.boutique/]lisinopril 5 mg medicine[/url]
[url=http://finasteride.guru/]where to buy finasteride[/url]
[url=https://clomid.works/]clomid buy online[/url]
[url=http://ventolin.digital/]ventolin sale uk[/url]
[url=http://proscar.today/]cheapest propecia online[/url]
[url=https://onlinepharmacy.monster/]indian pharmacy paypal[/url]
[url=http://sildenafil.wtf/]viagra 4 tablets[/url]
[url=http://prednisolone.monster/]prednisolone 20 mg buy online[/url]
[url=https://hydroxychloroquine.sale/]buy hydroxychloroquine sulfate[/url]
[url=https://finasteride.email/]cheap finasteride 5mg[/url]
These [url=http://synthroid.monster/]synthroid tabs[/url] made me feel worse instead of better.
[url=http://triamterene.today/]triamterene/hctz 37.5[/url]
[url=https://prednisone.boutique/]compare prednisone prices[/url]
[url=http://clomid.today/]clomid nz prescription[/url]
[url=https://sildenafil.email/]generic viagra price comparison[/url]
[url=http://prednisone.email/]buy prednisone online without prescription[/url]
[url=http://ivermectin.trade/]stromectol 6 mg tablet[/url]
[url=http://diflucan.today/]diflucan 150mg prescription[/url]
[url=https://sildenafil.run/]viagra purchase buy[/url]
[url=http://doxycycline.works/]buy doxycycline india[/url]
[url=http://finpecia.today/]buy propecia india[/url]
I wonder if the [url=http://allopurinolf.com/]allopurinol 300 mg price[/url] will ever go down.
[url=https://albendazole.today/]albendazole buy online canada[/url]
[url=http://albendazole.today/]albendazole tablets 400 mg price in india[/url]
Yo, where can I [url=https://lasix.monster/]buy lasix without prescription[/url]?
[url=https://proscar.today/]proscar online paypal[/url]
[url=https://lasix.email/]medication furosemide[/url]
[url=https://zofran.today/]zofran 8 mg cost[/url]
[url=http://metformin.wtf/]metformin hydrochloride[/url]
[url=https://clonidinepill.com/]clonidine 0.5 mg[/url]
[url=http://lasix.run/]lasix drug[/url]
[url=https://albendazole.today/]albendazole 200mg[/url]
[url=https://ampicillin.today/]ampicillin order[/url]
[url=http://sildenafil.digital/]can you buy viagra over the counter in us[/url]
[url=https://aprednisolone.com/]prednisolone buy usa[/url]
[url=https://albendazole.today/]where can i buy albendazole over the counter[/url]
[url=http://sertraline.today/]cost of brand name zoloft[/url]
[url=https://sildenafil.golf/]where can i buy 1 viagra pill[/url]
[url=http://lasix.guru/]lasix 250 mg[/url]
[url=http://levaquin.today/]levaquin prices[/url]
[url=https://tadalafil.best/]tadalafil 10mg[/url]
[url=https://lisinopril.works/]cost of lisinopril 10 mg[/url]
[url=http://propecia.guru/]finasteride 1 mg coupon[/url]
[url=http://synthroid.today/]synthroid best price[/url]
[url=https://flomax.cyou/]flomax 400 mg[/url]
[url=http://prednisolone.cfd/]prednisolone 20 mg buy online[/url]
[url=https://prozac.store/]fluoxetine 20 mg generic[/url]
[url=https://neurontin.monster/]neurontin rx[/url]
[url=http://dexonadexamethasone.quest/]dexamethasone usa[/url]
[url=http://prednisolone.cyou/]methylprednisolone[/url]
[url=https://finasteride.cfd/]generic 5mg propecia[/url]
[url=http://clomid.directory/]clomid over the counter australia[/url]
[url=http://clomid.directory/]buy over the counter clomid[/url]
[url=http://amoxicillin.monster/]amoxil 800 mg[/url]
[url=http://flomax.cfd/]noroxin drug[/url]
[url=https://wellbutrin.store/]generic wellbutrin price[/url]
[url=http://vermox.store/]where can you buy vermox[/url]
[url=https://aprednisolone.com/]medicine prednisolone 5mg[/url]
[url=http://cephalexin.cyou/]keflex generic cost[/url]
[url=http://prednisolone.cfd/]prednisolone online pharmacy uk[/url]
[url=https://prozac.store/]fluoxetine 80 mg[/url]
[url=https://acyclovir.cyou/]zovirax online usa[/url]
[url=https://clomid.directory/]buying clomid uk[/url]
[url=https://prednisolone.monster/]prednisolone 15 mg[/url]
[url=https://lasix.world/]furosemide australia[/url]
[url=https://dexonadexamethasone.quest/]dexamethasone 0.25[/url]
[url=https://azithromycin.cfd/]zithromax 500 mg[/url]
[url=https://budesonide.store/]budesonide generic[/url]
[url=http://antibioticsop.com/chloromycetin.html]chloromycetin 500 mg capsule[/url]
[url=https://medicinesaf.com/]canadapharmacy24h[/url]
[url=https://onlinepharmacy.best/modafinil.html]best generic modafinil[/url]
[url=https://drugstorepp.com/azithromycin.html]brand name azithromycin[/url]
[url=http://onlinepharmacy.best/albuterol.html]albuteraol without prescription[/url]
[url=http://drugstorepp.com/modafinil.html]800 mg modafinil[/url]
[url=http://drugstorepp.com/valtrex.html]valtrex drug[/url]
[url=http://pharmgf.com/doxycycline.html]doxycycline capsules[/url]
[url=https://antibioticsop.com/vantin.html]vantin 200 mg tablet[/url]
[url=http://sildenafil.live/malegra-dxt.html]malegra 100[/url]
[url=https://pharmgf.com/doxycycline.html]doxycycline 250[/url]
[url=https://pharmgf.com/advair.html]advair diskus 250 mcg 50 mcg[/url]
[url=http://sildenafil.live/kamagra.html]kamagra jelly for females[/url]
[url=https://pharmgf.com/tretinoin.html]price of tretinoin cream in india[/url]
[url=https://finasteride.science/fincar.html]5mg fincar[/url]
[url=http://onlinepharmacy.best/cytotec.html]cytotec for miscarriage[/url]
[url=http://pharmgf.com/finasteride.html]5mg propecia[/url]
[url=http://drugstorepp.com/synthroid.html]synthroid brand coupon[/url]
[url=https://pharmgf.com/accutane.html]accutane generic price[/url]
[url=https://sildenafil.live/silagra.html]silagra uk[/url]
[url=https://drugstorepp.com/modafinil.html]modafinil australia[/url]
[url=http://happyfamilydrugstore.org/]big pharmacy online[/url]
[url=https://sildenafil.live/kamagra.html]buy kamagra jelly uk[/url]
[url=http://drugstorepp.com/tadalafil.html]cialis super active buy[/url]
[url=https://onlinepharmacy.best/advair.html]advair diskus online[/url]
[url=http://lasixfd.online/]lasix india[/url]
[url=http://clonidine.science/]purchase clonidine online[/url]
[url=https://atomoxetine.party/]strattera 100 mg[/url]
[url=https://zoloft.beauty/]cheap generic zoloft[/url]
[url=https://trazodone.party/]trazodone without prescription[/url]
[url=https://femaleviagra.party/]real female viagra[/url]
[url=https://atomoxetine.party/]strattera canada pharmacy[/url]
[url=http://toradol.trade/]how much is toradol[/url]
[url=http://tadalafil.skin/]cialis cheap online[/url]
[url=http://diflucan.africa/]diflucan 200 mg cost[/url]
[url=http://accutanes.online/]how much is accutane generic[/url]
[url=https://clonidine.science/]clonidine hcl 0.1 mg[/url]
[url=https://valtrex.party/]valtrex pills price[/url]
[url=http://albuterol.skin/]can i buy albuterol online[/url]
[url=https://diflucan.africa/]diflucan rx[/url]
[url=http://happyfamilycanadianpharmacy.online/]canadian pharmacy online ship to usa[/url]
[url=http://happyfamilyonlinestore.online/]online pharmacy delivery[/url]
[url=https://onlinepharmacy.party/]best canadian online pharmacy[/url]
[url=https://prednisolone.africa/]prednisolone 15 mg tablet[/url]
[url=https://happyfamilystore24.online/]online pharmacy pain relief[/url]
[url=https://erythromycin.pics/]2 erythromycin[/url]
[url=https://tadalafil.africa/]cialis brand name[/url]
[url=http://prednisolone.science/]prednisolone 25mg price uk[/url]
[url=http://happyfamilycanadianpharmacy.online/]hq pharmacy online 365[/url]
[url=http://lisinoprilv.online/]lisinopril 2.5 mg[/url]
[url=https://permethrin.science/]generic acticin[/url]
[url=http://happyfamilycanadianpharmacy.online/]northwest pharmacy canada[/url]
[url=https://trazodone.trade/]trazodone generic brand name[/url]
[url=https://valtrex.party/]order valtrex online[/url]
[url=https://citalopram.trade/]celexa brand name cost[/url]
[url=https://tadalafil.africa/]tadalafil female[/url]
[url=http://accutanes.online/]canadian online pharmacy accutane[/url]
[url=https://kamagra.pics/]cheap kamagra 100mg[/url]
[url=https://happyfamilystoreonline.online/]canadian pharmacy ed medications[/url]
[url=https://hydroxychloroquine.pics/]hydroxychloroquine medication[/url]
[url=https://aurogra.science/]aurogra[/url]
[url=http://clomid.science/]clomid prescription price[/url]
[url=https://fildena.science/]fildena 100 usa[/url]
[url=https://paxil.trade/]paxil 10 mg price[/url]
[url=https://sumycin.science/]buy tetracycline online usa[/url]
[url=http://fluoxetine.pics/]prozac 90mg[/url]
[url=https://budesonide.party/]budesonide 100 mcg[/url]
[url=http://tizanidine.science/]tizanidine 2mg[/url]
[url=http://tadacip.trade/]buy tadacip online india[/url]
[url=https://finpecia.science/]propecia cost singapore[/url]
[url=http://dexamethasone2023.online/]dexamethasone uk buy[/url]
[url=http://effexor.party/]effexor prescription[/url]
[url=http://genericcialis40mgprice.quest/]where to get cialis online[/url]
[url=https://happyfamilystoreonline.online/]cheapest pharmacy canada[/url]
[url=https://doxycycline.africa/]doxycycline 100 mg price uk[/url]
[url=https://zoloft.party/]zoloft pills 50mg[/url]
[url=http://tizanidine.science/]cheap zanaflex online[/url]
[url=http://zanaflex.download/]zanaflex generic[/url]
[url=http://sildenafiltn.online/]how can i get sildenafil prescription online[/url]
[url=http://toradol.trade/]otc toradol[/url]
[url=http://azithromycin.skin/]azithromycin 500 dosage online pharmacy[/url]
[url=https://azithromycin.skin/]zithromax 250 mg australia[/url]
[url=http://orderviagra200norx.quest/]where to buy viagra pills online[/url]
[url=http://permethrin.science/]elimite buy online[/url]
[url=http://cheapcialis5rx.monster/]rx tadalafil tablets[/url]
[url=http://zanaflex.download/]rx tizanidine[/url]
[url=https://modafinil.party/]modafinil united states[/url]
[url=https://albuterolx.online/]ventolin prescription cost[/url]
[url=http://happyfamilypharmacycanada.org/]online pharmacy cialis[/url]
[url=https://tretinoin.science/]can you buy retin a cream over the counter[/url]
[url=https://paxil.science/]paroxetine 100 mg[/url]
[url=https://indocin.pics/]indocin 100mg[/url]
[url=http://ifinasteride.online/]cost of propecia 1mg[/url]
[url=http://ivermectin.click/]ivermectin 3mg tablet[/url]
[url=https://roaccutane.online/]buy accutane uk[/url]
[url=https://dexamethasonen.online/]dexamethasone 75 mg tablet[/url]
[url=https://albuterold.online/]buy ventolin inhaler without prescription[/url]
[url=https://nolvadex.science/]where to buy nolvadex australia[/url]
[url=http://paxil.science/]price of paroxetine[/url]
[url=http://adexamethasone.online/]dexamethasone over the counter[/url]
[url=http://amoxicillinbact.online/]amoxicillin 500 tablet[/url]
[url=http://diflucanbsn.online/]medication diflucan price[/url]
[url=http://paxil.science/]buy paroxetine 20 mg online uk[/url]
[url=https://malegra.party/]malegra fxt uk[/url]
[url=https://valacyclovir.science/]where to buy valtrex generic[/url]
[url=http://clonidine.party/]buy clonidine online uk[/url]
[url=https://robaxin.science/]buy robaxin online[/url]
[url=http://tamoxifen.download/]nolvadex 40mg[/url]
[url=http://prednisolone.business/]prednisolone acetate[/url]
[url=https://happyfamilystorepharmacy.net/]cheapest pharmacy for prescriptions[/url]
[url=http://okmodafinil.online/]where to get modafinil online[/url]
[url=https://doxycyclineanb.online/]buy doxycycline australia[/url]
[url=http://toradol.pics/]toradol 70 mg tablet[/url]
[url=http://accutanepill.skin/]accutane pharmacy[/url]
[url=https://abaclofen.online/]buy baclofen uk[/url]
[url=http://albuterold.online/]albuterol in mexico[/url]
[url=https://buspar.party/]buspar 15 mg[/url]
[url=http://zoloft.science/]buy zoloft on line no prescription[/url]
[url=http://clonidine.party/]generic clonidine[/url]
[url=http://tretinoin.science/]tretinoin cream 0.1 for sale[/url]
[url=http://albuterolx.online/]albuterol nz[/url]
[url=https://lisinoprill.online/]zestril 40 mg[/url]
[url=https://zestoretic.party/]zestoretic 10 mg[/url]
[url=http://zestoretic.party/]buy zestoretic online[/url]
[url=https://diflucan.media/]buy diflucan online australia[/url]
[url=https://avodart.party/]avodart 0.5 mg tab[/url]
[url=https://celexa.science/]celexa without prescription[/url]
[url=http://prednisolonelx.online/]prednisolone 5mg tablet price[/url]
[url=https://ciproo.com/]ciprofloxacin 500mg cost[/url]
[url=http://synthroid.science/]synthroid 125 mcg coupon[/url]
[url=http://propecia.science/]online propecia uk[/url]
[url=https://albenza.party/]albendazole 200mg[/url]
[url=http://modafinil.beauty/]modafinil prescription online[/url]
[url=http://tretinoincream.skin/]retin a over the counter australia[/url]
[url=http://acyclov.online/]acyclovir buy online canada[/url]
[url=https://albuterol.run/]ventolin prescription australia[/url]
[url=https://albuterold.online/]ventolin 100mcg online[/url]
[url=http://lasixni.online/]furosemide tablets for sale[/url]
[url=https://tretinoin.science/]tretinoin 25 gel[/url]
[url=https://roaccutane.online/]buy accutane tablets[/url]
[url=https://hydrochlorothiazide.party/]hydrochlorothiazide prescription coupon[/url]
[url=http://diflucan.media/]diflucan 50[/url]
[url=http://happyfamilymedstore.org/]pharmacy without prescription[/url]
[url=http://clonidine.party/]clonidine india[/url]
[url=http://hydroxychloroquine.trade/]hydroxychloroquine[/url]
[url=http://celexa.science/]celexa 30 mg[/url]
[url=http://ciprocfx.online/]cipro 2017[/url]
[url=https://tretinon.com/]how can i get retin a[/url]
[url=http://clonidine.media/]clonidine 0.05 mg[/url]
[url=http://mebendazole.science/]can you buy vermox over the counter in usa[/url]
[url=https://glucophage.company/]metformin sr[/url]
[url=http://lopressor.science/]lopressor xl[/url]
[url=http://azithromycinq.com/]zithromax mexico[/url]
[url=https://suhagra.online/]suhagra 100 online purchase[/url]
[url=http://mebendazole.party/]where to get vermox[/url]
[url=https://retinacream.skin/]1 retin a[/url]
[url=http://ampicillin.trade/]ampicillin from mexico[/url]
[url=https://silagra.download/]silagra 50 mg price[/url]
[url=http://tetracycline.party/]tetracycline 500mg price[/url]
[url=http://tadalafilgf.online/]prices of cialis daily use[/url]
[url=https://zithromaxzpk.online/]buy azithromycin tablets in us[/url]
[url=https://finpecia.party/]where can i buy generic propecia[/url]
[url=http://mebendazole.party/]vermox buy[/url]
[url=https://ampicillin.trade/]ampicillin capsules brand name[/url]
[url=http://vardenafil.science/]cheap generic levitra online[/url]
[url=http://tamoxifen.science/]tamoxifen 20 mg price in india[/url]
[url=http://azithromycinhq.online/]can you buy zithromax over the counter[/url]
[url=http://tretinon.com/]retin a over the counter australia[/url]
[url=http://metforminb.online/]metformin 397[/url]
[url=http://paxil.pics/]paroxetine 5 mg tablet[/url]
[url=http://zithromaxzpk.online/]azithromycin generic over the counter[/url]
[url=https://baclofem.online/]baclofen tablet price[/url]
[url=https://lasixd.online/]40 mg lasix[/url]
[url=https://silagra.pics/]silagra 50 mg india[/url]
[url=http://prednisolone.party/]buy prednisolone 5mg[/url]
[url=http://dipyridamole.party/]dipyridamole tabs[/url]
[url=https://zithromax.party/]azithromycin online canada[/url]
[url=http://azithromycin.party/]azithromycin 500mg purchase[/url]
[url=https://zovirax.shop/]acyclovir cream 10g[/url]
[url=http://anafranil.party/]anafranil 100 mg[/url]
[url=http://dipyridamole.party/]dipyridamole tablets in india[/url]
[url=http://prazosin.party/]buy prazosin 1mg[/url]
[url=http://colchicine.online/]colchicine[/url]
[url=http://anafranil.party/]where to buy anafranil[/url]
[url=http://promethazine.party/]phenergan vc[/url]
[url=http://accutaneo.online/]accutane in mexico[/url]
[url=http://clomidsale.online/]buy clomid tablets uk[/url]
[url=http://dipyridamole.party/]dipyridamole 200 mg capsules[/url]
[url=https://amoxicillini.online/]amoxicillin 250mg price in india[/url]
[url=http://glucophage.company/]glucophage cost in usa[/url]
[url=http://clonidine.media/]clonidine europe[/url]
[url=http://baclofem.online/]baclofen over the counter canada[/url]
[url=http://ciprok.online/]cipro brand[/url]
[url=http://atenolol.science/]atenolol discount[/url]
[url=https://tretinoin.skin/]otc retin a[/url]
[url=http://dipyridamole.party/]dipyridamole buy online[/url]
[url=http://diflucan.party/]diflucan mexico[/url]
[url=https://colchicine.online/]where to buy colchicine[/url]
[url=http://silagra.download/]silagra 100 for sale[/url]
[url=http://azithromycinq.com/]zithromax 500mg cost[/url]
[url=https://prednisonenp.online/]prednisone 60 mg[/url]
[url=http://azithromycinq.com/]azithromycin 600 mg[/url]
[url=http://anafranil.party/]anafranil 10 mg[/url]
[url=http://glucophage.company/]metformin 2000 mg daily[/url]
[url=http://suhagra.online/]suhagra 50 mg price in india[/url]
[url=http://elimite.party/]elimite 5[/url]
[url=https://tetracycline.party/]tetracycline buy[/url]
[url=http://vardenafil.science/]order vardenafil[/url]
[url=http://diclofenac.download/]buy voltaren without prescription[/url]
[url=http://doxycyclinepr.online/]doxycycline 100mg online[/url]
[url=https://modafinilr.online/]modafinil cheap uk[/url]
[url=http://elimite.party/]cost of permethrin cream[/url]
[url=https://tadacip.science/]tadacip canada[/url]
[url=http://tadacip.science/]tadacip india price[/url]
[url=https://prednison.online/]how much is a prednisone prescription[/url]
[url=https://finpecia.party/]propecia gel[/url]
[url=https://diclofenac.download/]voltaren gel 100g[/url]
[url=http://modafinilr.online/]provigil from canada[/url]
[url=http://medrol.party/]medrol 4 mg dose pack[/url]
[url=http://felomax.online/]flomax liquid[/url]
[url=https://clomidsale.online/]clomid 100 mg tablet[/url]
[url=https://tadalafilh.online/]buy tadalafil 10mg india[/url]
[url=https://atenolol.science/]atenolol 50 mg india[/url]
[url=https://tretinoin.skin/]tretinoin 1 uk[/url]
[url=http://doxycyclinepr.online/]doxycycline india pharmacy[/url]
[url=https://ciproe.online/]cipro 250 mg tabs[/url]
[url=http://motilium.party/]where can i buy motilium in usa[/url]
[url=http://prednisonee.online/]prednisone 10mg tablet cost[/url]
[url=https://clomip.com/]buy clomid otc[/url]
[url=http://ilasix.online/]order lasix without a prescription[/url]
[url=https://aprednisone.online/]prednisone 1.25 mg[/url]
[url=https://lyricanx.online/]medicine lyrica 75 mg[/url]
[url=http://diflucanld.online/]where to buy diflucan in uk[/url]
[url=https://albuterolhi.online/]can you purchase albuterol over the counter[/url]
[url=http://acqutane.online/]accutane canada cost[/url]
[url=https://prednisonefn.online/]generic prednisone 20mg[/url]
[url=https://albuterolhi.online/]can you buy albuterol otc[/url]
[url=https://synthroidcr.online/]synthroid 112[/url]
[url=https://amoxicillinf.online/]amoxil 400 mg[/url]
[url=http://aprednisone.online/]prednisone rx[/url]
[url=https://happyfamilystore365.com/]escrow pharmacy canada[/url]
[url=http://prednisonee.online/]prednisone 2 mg tablets[/url]
[url=http://alisinopril.online/]buy lisinopril 20 mg online uk[/url]
[url=http://valtrexm.online/]valtrex from india[/url]
[url=http://finasteridepb.online/]how much is finasteride[/url]
[url=http://lyricatb.online/]lyrica discount[/url]
[url=http://finasteridel.online/]buy propecia online uk[/url]
[url=http://diflucanv.online/]diflucan one[/url]
[url=http://accutanelb.online/]accutane generic canada[/url]
[url=https://retinagel.skin/]best retin a over the counter[/url]
[url=http://vermoxpr.online/]where to buy vermox in uk[/url]
[url=http://albuterolhl.online/]ventolin 2018[/url]
[url=https://finasteridel.online/]propecia mexico[/url]
[url=https://baclofendl.online/]buy baclofen 20 mg[/url]
[url=https://valtrexm.online/]valtrex no prescription[/url]
[url=https://lyricatb.online/]lyrica discount[/url]
[url=https://prednisome.online/]how can i get prednisone[/url]
[url=http://synthroidcr.online/]synthroid 0.05[/url]
[url=http://clomip.com/]clomid pills otc[/url]
[url=https://prednisonee.online/]cheapest prednisone no prescription[/url]
[url=https://valtrexm.online/]valtrex uk pharmacy[/url]
[url=https://vermoxpr.online/]vermox 200mg[/url]
[url=http://aprednisone.online/]prednisone 5mg price[/url]
[url=http://valtarex.com/]valtrex cream over the counter[/url]
[url=http://prednisome.online/]prednisone 10mg price in india[/url]
[url=http://ibaclofeno.online/]baclofen tabs[/url]
[url=https://lyricatb.online/]lyrica 25mg price[/url]
[url=https://diflucanv.com/]can i purchase diflucan over the counter[/url]
[url=http://valtrexm.online/]buy valtrex india[/url]
[url=http://retinagel.skin/]retin a 1 canada[/url]
[url=https://prednisome.online/]buy prednisone online canada[/url]
[url=http://prednisonefn.online/]prednisone 2.5 mg[/url]
[url=https://suhagraxs.online/]suhagra 50[/url]
[url=http://ovaltrex.com/]buy valtrex online canada[/url]
[url=https://retinagel.skin/]best retin a cream in india[/url]
[url=https://clomip.com/]buy clomid online prescription[/url]
[url=http://albuterolhi.online/]ventolin 90 mg[/url]
[url=https://predonisone.online/]apo prednisone[/url]
[url=https://accutanelb.online/]how to get accutane australia[/url]
[url=http://prednisonefn.online/]prednisone 4 tablets daily[/url]
[url=http://clomip.com/]clomid 25 mg daily[/url]
[url=https://acqutane.online/]accutane price in mexico[/url]
[url=http://vermoxpr.online/]vermox pharmacy[/url]
[url=https://ovaltrex.com/]can you buy valtrex over the counter in uk[/url]
[url=http://vermoxpr.online/]vermox 500mg tablet price[/url]
[url=http://happyfamilyrxstorecanada.com/]canadian mail order pharmacy[/url]
[url=http://lisinoprilrm.online/]lisinopril india[/url]
[url=http://lisinoprilrm.online/]lisinopril cheap price[/url]
[url=http://azithromycinx.online/]azithromycin 500 mg tablet cost[/url]
[url=http://valtrexbc.online/]how much is valtrex canada[/url]
[url=https://lisinoprilhc.online/]lisinopril 10 mg tablets price[/url]
[url=https://aprednisone.online/]how to get prednisone over the counter[/url]
[url=https://lyricanx.online/]lyrica cap 50mg[/url]
[url=https://happyfamilyrxstorecanada.com/]non prescription medicine pharmacy[/url]
[url=http://lisinoprilhc.online/]zestril price[/url]
[url=http://albuterolhi.online/]albuterol 2.5 mg coupon[/url]
[url=http://lyricadp.online/]lyrica 10 mg[/url]
[url=http://prednisonefn.online/]prednisone 20 mg tablet cost[/url]
[url=https://baclofendl.online/]baclofen 300 mg[/url]
[url=http://finasteridepb.online/]where to buy propecia[/url]
[url=http://azithromycini.online/]buy zithromax no prescription[/url]
[url=https://elimite.skin/]buy elimite cream over the counter[/url]
[url=http://lisinoprilrm.online/]lisinopril cost canada[/url]
[url=https://happyfamilystore365.com/]best australian online pharmacy[/url]
[url=http://lyricadp.online/]generic lyrica medication[/url]
[url=https://happyfamilyrxstorecanada.com/]uk pharmacy no prescription[/url]
[url=http://tadalafilvr.online/]cheap tadalafil canada[/url]
[url=https://doxycyclinedsp.online/]buying doxycycline online in usa[/url]
[url=https://ovaltrex.com/]valtrex purchase online[/url]
[url=https://lisinoprilas.online/]lisinopril canada[/url]
[url=http://aprednisone.online/]prednisone 10 mg price in india[/url]
[url=https://iprednisone.online/]buy prednisone cheap[/url]
[url=https://lisinoprilhc.online/]drug lisinopril[/url]
[url=https://finasteridel.online/]generic propecia 5mg[/url]
[url=http://diflucanld.online/]diflucan generic price[/url]
[url=http://prednisome.online/]buy predisone steriods[/url]
[url=http://prednisonee.online/]prednisone 12.5 mg[/url]
[url=https://permethrin.skin/]cost of permethrin cream[/url]
[url=https://permethrin.skin/]acticin cream buy[/url]
[url=http://metforminzb.online/]metformin 850 mg buy online[/url]
[url=https://prednisonefn.online/]prednisone tablets 5mg price[/url]
[url=https://medlyrica.online/]buy lyrica online no prescription[/url]
[url=http://happyfamilystore365.com/]maple leaf pharmacy in canada[/url]
[url=https://aprednisone.online/]buy prednisone no prescription[/url]
[url=http://prednisonee.online/]prednisone for sale without a prescription[/url]
[url=https://diflucanv.online/]cheap diflucan online[/url]
[url=http://lisinoprilhc.online/]30mg lisinopril[/url]
[url=https://predonisone.online/]prednisone oral[/url]
[url=http://happyfamilystore365.com/]cheapest pharmacy to fill prescriptions without insurance[/url]
[url=http://alisinopril.online/]medication zestoretic[/url]
[url=http://lisinoprilrm.online/]lisinopril 12.5 mg tablets[/url]
[url=http://prednisonebv.online/]deltasone 50 mg cost[/url]
[url=https://happyfamilystore365.com/]happy family store[/url]
[url=http://alisinopril.online/]lisinopril 5mg tabs[/url]
[url=http://metforminex.online/]where can i get metformin online[/url]
[url=https://valtarex.com/]valtrex cream cost[/url]
[url=https://doxycyclinedsp.online/]doxycycline 500 mg capsules[/url]
[url=http://lyricanx.online/]lyrica 50 mg price in india[/url]
[url=http://baclofendl.online/]baclofen medicine pills[/url]
[url=https://azithromycinx.online/]how much is azithromycin 250 mg[/url]
[url=https://finasteridepb.online/]propecia australia buy[/url]
[url=https://metforminex.online/]order glucophage[/url]
[url=https://ovaltrex.com/]buy valtrex cheap[/url]
[url=https://amoxicillinf.online/]amoxicillin 8500 mg[/url]
[url=https://iprednisone.online/]prednisone online australia[/url]
[url=http://ovaltrex.com/]valtrex for sale canada[/url]
[url=http://aprednisone.online/]prednisone 10 mg order online[/url]
[url=https://azithromycini.online/]generic azithromycin cost[/url]
[url=http://valtrexbc.online/]buy valtrex[/url]
[url=http://lyricanx.online/]lyrica 100 mg cost[/url]
[url=https://elimite.skin/]how much does permethrin cost[/url]
[url=http://finasteridepb.online/]generic propecia uk[/url]
[url=http://predonisone.online/]prednisone 100 mg[/url]
[url=https://prednisome.online/]prednisone brand name[/url]
[url=https://finasteridel.online/]prescription propecia 1mg[/url]
[url=http://metforminzb.online/]online metformin[/url]
[url=http://clomip.com/]clomid pharmacy prices[/url]
[url=http://azithromycinq.online/]zithromax 25mg[/url]
[url=https://esynthroid.online/]synthroid 110 mcg[/url]
[url=http://synthroidt.online/]synthroid 0.50 mg[/url]
[url=http://diflucanv.com/]diflucan where to buy uk[/url]
[url=https://azithromycinq.online/]buy zithromax usa[/url]
[url=https://prednisonebv.online/]prednisone cream over the counter[/url]
[url=http://ibaclofeno.online/]baclofen 20 mg price in india[/url]
[url=http://medlyrica.online/]lyrica tablets for sale[/url]
[url=https://permethrin.skin/]elimite otc prescription[/url]
[url=http://diflucanv.com/]diflucan pill for sale[/url]
[url=http://diflucanld.online/]diflucan 250 mg[/url]
[url=https://baclofendl.online/]lioresal cost[/url]
[url=http://metforminex.online/]metformin 500mg tablets cost[/url]
[url=https://diflucanv.com/]diflucan 150mg prescription[/url]
[url=https://azithromycinq.online/]zithromax 2 pills[/url]
[url=http://lyricatb.online/]buy lyrica 150mg[/url]
[url=http://finasteridepb.online/]propecia 1mg tabs[/url]
[url=https://metforminex.online/]cheap metformin online[/url]
[url=http://diflucanv.online/]buy diflucan 150 mg[/url]
[url=http://prednisonebv.online/]prednisone ordering online[/url]
[url=https://diflucanv.online/]diflucan pill otc[/url]
[url=https://ilasix.online/]buy lasix online with mastercard[/url]
[url=https://predonisone.online/]prednisone order online uk[/url]
[url=http://elimite.skin/]acticin 5 cream[/url]
[url=https://dexamethasonelt.online/]dexamethasone 500 mg[/url]
[url=http://happyfamilyrxstorecanada.com/]indian pharmacies safe[/url]
[url=https://azithromycini.online/]buy azithromycin online without prescription[/url]
[url=http://prednisonefn.online/]prednisone prescription[/url]
[url=https://prednisome.online/]prednisone canada pharmacy[/url]
[url=https://ovaltrex.com/]valtrex without prescription[/url]
[url=https://augmentin.best/]amoxil 500[/url]
[url=https://phenergan.cyou/]phenergan 50 mg[/url]
[url=http://citalopram.cyou/]40 mg citalopram[/url]
[url=https://accutane.cfd/]accutane for sale uk[/url]
[url=https://tadalafil.cfd/]real cialis pills[/url]
[url=https://pharmacyonline.cfd/]canadian pharmacy india[/url]
[url=http://vardenafil.cyou/]drug vardenafil pills[/url]
[url=https://budesonide.cyou/]budesonide 3mg capsules[/url]
[url=http://synthroid.boutique/]cost of synthroid 75 mcg[/url]
[url=http://tadalafil.cfd/]cialis 300mg[/url]
[url=https://clonidine.cfd/]clonidine 02 mg[/url]
[url=http://propecia.cyou/]can you buy finasteride over the counter[/url]
[url=https://fildena.cfd/]fildena 50[/url]
[url=https://retina.cfd/]tretinoin discount[/url]
[url=http://allopurinol.cfd/]buy allopurinol without prescription[/url]
[url=http://onlinepharmacy.cyou/]canadian pharmacy online ship to usa[/url]
[url=http://augmentin.best/]augmentin 500 tablet[/url]
[url=http://furosemide.cyou/]lasix for sale online[/url]
[url=https://albuterol.guru/]combivent order[/url]
[url=https://augmentin.cfd/]augmentin 125[/url]
[url=https://clonidine.cfd/]clonidine 0.025 mg[/url]
[url=https://clomid.digital/]buy clomid pills online[/url]
[url=http://lyrica.cfd/]lyrica 450 mg[/url]
[url=https://onlinepharmacy.cyou/]safe online pharmacies[/url]
[url=https://colchicine.cyou/]colchicine 6 mg[/url]
[url=http://tadalafil.cfd/]soft cialis generic[/url]
[url=https://vardenafil.directory/]buy cheap generic levitra online[/url]
[url=http://fluconazole.cyou/]can i buy diflucan over the counter in canada[/url]
[url=http://prozac.cfd/]prozac capsules 30 mg[/url]
[url=https://clonidine.cfd/]clonidine 30 mg[/url]
[url=https://amoxicillin.cyou/]order amoxicillin online[/url]
[url=https://finasteride.digital/]buy generic propecia in australia[/url]
[url=https://augmentin.best/]amoxicillin in usa[/url]
[url=https://vardenafil.cyou/]order vardenafil online[/url]
[url=http://clomid.digital/]buy clomid discount[/url]
[url=http://gabapentin.cfd/]gabapentin cream where to buy[/url]
[url=https://fluconazole.cyou/]where to buy diflucan in uk[/url]
[url=http://baclofen.cyou/]buy baclofen europe[/url]
[url=https://tadalafil.cyou/]tadalafil 10mg online india[/url]
[url=https://pharmacyonline.cfd/]escrow pharmacy canada[/url]
[url=http://zithromax.cyou/]buy cheap generic zithromax[/url]
[url=https://ivermectin.guru/]ivermectin oral solution[/url]
[url=http://doxycycline.cyou/]doxycycline 40 mg coupon[/url]
[url=https://synthroid.directory/]225 mcg synthroid[/url]
[url=https://augmentin.guru/]amoxicillin 400[/url]
[url=http://colchicine.cyou/]colchicine probenecid brand name[/url]
[url=https://levitra.cfd/]buy vardenafil 40 mg[/url]
[url=https://finasteride.best/]cheap propecia online uk[/url]
[url=http://accutane.cyou/]buy accutane europe[/url]
[url=http://accutane.cyou/]accutane price in canada[/url]
[url=http://gabapentin.cfd/]gabapentin 600 mg cost[/url]
[url=http://prozac.cfd/]fluoxetine 20 mg capsule price[/url]
[url=http://amoxicillin.cyou/]amoxicillin 850 mg[/url]
[url=http://finasteride.best/]how to get propecia uk[/url]
[url=https://lexapro.cfd/]lexapro 2017[/url]
[url=https://sildenafil.cyou/]cheap generic sildenafil[/url]
[url=https://sildenafil.cyou/]generic viagra online us pharmacy[/url]
[url=http://tadalafil.cyou/]buy tadalafil no prescription[/url]
[url=https://amoxicillin.boutique/]augmentin brand name price[/url]
[url=https://robaxin.cyou/]robaxin prescription[/url]
[url=http://tadalafil.cfd/]tadalafil price[/url]
[url=https://clonidine.best/]clonidine for dogs[/url]
[url=https://prozac.cfd/]prozac 160 mg[/url]
[url=https://silagra.cyou/]silagra 25 mg[/url]
[url=http://neurontin.cfd/]medicine gabapentin 100mg[/url]
[url=https://neurontin.cyou/]gabapentin 600 mg pill[/url]
[url=https://tadalafil.cfd/]cheapest tadalafil 5mg[/url]
[url=https://finasteride.cyou/]propecia where to buy[/url]
[url=https://suhagra.cyou/]suhagra 100 mg online[/url]
[url=http://lyrica.cfd/]buying lyrica in mexico[/url]
[url=http://citalopram.cyou/]15 mg celexa[/url]
[url=http://propranolol.cyou/]propranolol prescription australia[/url]
[url=http://sildenafil.cyou/]order real viagra[/url]
[url=https://finpecia.cyou/]propecia tablets in india[/url]
[url=http://prednisone.cyou/]generic prednisone for sale[/url]
[url=http://bactrim.cyou/]rx bactrim[/url]
[url=https://suhagra.cyou/]buy suhagra 50mg[/url]
[url=http://clonidine.cfd/]clonidine er[/url]
[url=https://robaxin.cyou/]robaxin where to buy[/url]
[url=https://effexor.cyou/]effexor cost 75 mg[/url]
[url=https://vardenafil.cyou/]canadian pharmacy levitra[/url]
[url=https://fluoxetine.cyou/]fluoxetine cost uk[/url]
[url=https://accutane.cfd/]how to get accutane in india[/url]
[url=https://effexor.cyou/]effexor price usa[/url]
[url=https://colchicine.cyou/]buy cheap colchicine[/url]
[url=https://trazodone.cfd/]trazodone 40 mg[/url]
[url=https://vermox.cfd/]vermox usa[/url]
[url=https://clonidine.best/]clonidine 0.1 mg[/url]
[url=https://finasteride.digital/]finasteride online usa[/url]
[url=http://ivermectin.guru/]purchase oral ivermectin[/url]
[url=https://avana.cfd/]dapoxetine tablets south africa[/url]
[url=http://augmentin.cyou/]amoxicillin 500 mexico[/url]
[url=https://sildenafil.cfd/]canadian viagra[/url]
[url=http://vermox.cyou/]where can i get vermox[/url]
[url=http://vardenafil.cfd/]cheap levitra in usa[/url]
[url=https://vardenafil.cfd/]levitra pills singapore[/url]
[url=https://azithromycin.digital/]how to buy zithromax[/url]
[url=http://neurontin.cyou/]gabapentin 215 300 mg[/url]
[url=http://fildena.cfd/]fildena 100mg[/url]
[url=https://accutane.cyou/]accutane 5 mg 10mg[/url]
[url=http://lexapro.cfd/]lexapro cost usa[/url]
[url=http://albuterol.cyou/]albuterol inhaler price[/url]
[url=http://gabapentin.cfd/]where can i buy gabapentin online[/url]
[url=https://lisinopril.cfd/]lisinopril 20 mg tabs[/url]
[url=https://hydroxychloroquine.guru/]hydroxychloroquine plaquenil cost[/url]
[url=http://allopurinol.cfd/]allopurinol 100mg coupon[/url]
[url=http://ivermectin.guru/]ivermectin 18mg[/url]
[url=http://vardenafil.directory/]buy levitra 60mg tablets online usa[/url]
[url=https://ivermectin.guru/]stromectol pill for humans[/url]
[url=http://clonidine.cyou/]clonidine 0.025[/url]
[url=https://vardenafil.directory/]levitra online from india[/url]
[url=http://prednisolone.directory/]buy cheap prednisolone[/url]
[url=http://propranolol.cfd/]propranolol 120 mg capsules[/url]
[url=http://sildenafil.cyou/]where to buy female viagra canada[/url]
[url=http://baclofen.cyou/]cost of 30 baclofen[/url]
[url=http://lexapro.cfd/]best price for lexapro generic[/url]
[url=http://retina.directory/]where can i buy tretinoin[/url]
[url=https://toradol.cfd/]toradol over the counter canada[/url]
[url=http://albuterol.cfd/]order albuterol[/url]
[url=https://augmentin.cyou/]cost augmentin[/url]
[url=http://tadalafil.cfd/]800 mg cialis[/url]
[url=https://furosemide.cyou/]lasix 60[/url]
[url=http://augmentin.best/]lowest price augmentin[/url]
[url=https://metformin.cfd/]purchase metformin canada[/url]
[url=https://retina.directory/]tretinoin nz[/url]
[url=https://doxycycline.cfd/]doxycycline cap 50mg[/url]
[url=http://prednisone.cyou/]prednisone in canada[/url]
[url=http://lexapro.cfd/]lexapro 20mg[/url]
[url=https://zoloft.cyou/]buy zoloft online without prescription[/url]
[url=http://augmentin.cfd/]amoxicillin 500 mg capsule cost[/url]
[url=http://vardenafil.directory/]levitra canada for sale[/url]
[url=https://finasteride.best/]how to order propecia online[/url]
[url=https://doxycycline.directory/]doxycycline uk pharmacy[/url]
[url=http://sildenafil.cfd/]over the counter female viagra australia[/url]
[url=https://phenergan.cyou/]phenergan drug[/url]
[url=https://clomid.digital/]order clomid online usa[/url]
[url=https://avana.cfd/]avana 50 mg[/url]
[url=https://diflucan.cyou/]diflucan tablet cost[/url]
[url=http://vermox.cyou/]where can i buy vermox medication online[/url]
[url=https://zoloft.cyou/]buy zoloft australia[/url]
[url=https://doxycycline.directory/]doxycycline australia[/url]
[url=https://synthroid.directory/]generic synthroid medication[/url]
[url=https://metformin.cfd/]metformin tablets for sale[/url]
[url=https://amoxil.cfd/]augmentin uk online[/url]
[url=https://avana.cfd/]dapoxetine uk cheap[/url]
[url=http://gabapentin.cfd/]neurontin 800 mg price[/url]
[url=http://prozac.cfd/]prozac purchase[/url]
[url=http://retina.directory/]where to get retin a cream[/url]
[url=http://silagra.cyou/]silagra online uk[/url]
[url=http://azithromycin.digital/]azithromycin tablets over the counter[/url]
[url=https://synthroid.boutique/]synthroid 0.1[/url]
[url=https://synthroid.boutique/]buy synthroid online[/url]
[url=http://onlinepharmacy.cyou/]escrow pharmacy canada[/url]
[url=http://zithromax.cyou/]azithromycin 500mg lowest price online[/url]
[url=http://albuterol.cfd/]combivent coupon[/url]
[url=http://amoxil.cfd/]purchase amoxicillin 500 mg[/url]
[url=https://fildena.cfd/]fildena 50 mg price in india[/url]
[url=http://augmentin.cyou/]augmentin 875 mg tablets price[/url]
[url=https://vermox.cyou/]where can you buy vermox[/url]
[url=https://robaxin.cyou/]3000mg robaxin[/url]
[url=http://vardenafil.cfd/]where to buy levitra without prescription[/url]
[url=https://zoloft.cyou/]zoloft 50 mg daily[/url]
[url=https://gabapentin.cfd/]gabapentin from india[/url]
[url=https://neurontin.cfd/]neurontin 400 mg tablets[/url]
[url=https://accutane.guru/]buy accutane online fast delivery[/url]
[url=http://clomid.digital/]how to order clomid[/url]